Create an RPG world
Table of Contents
2.7.1 Create the animation clips
2.7.2 Normal animation state machine
2.7.3 Animation state machine using blend trees
2.8 AI characters and other animated objects
3.1.4 The roads and rocks tilemap
6.3.1.3 LocalizationManager.cs
1. Objective
Create an RPG game using Unity:
- Create a world using tilemaps
- Add basic animation for the player (state machine with/out blend trees)
- Create simple objects interaction
- Create a menu with a player setup window
This tutorial is written for intermediate Unity 3D users.
The WebGL demo is here.
2. Environment
2.1 Unity
Set up a 2D Unity project.
Add the Unity UI Samples from the Asset Store. This asset will be used to create the menu scene.
Create the following folders tree in the project window:
- Animations
- Animals
- OtherCharacters
- Plants
- Players
- Fonts
- Prefabs
- Scenes
- Scripts
- Sprites
- Animals
- HouseIndoor
- Houses
- Items
- Players
- Roads
- Rocks
- Tilesets
- Vegetation
- TilePalettes
2.2 Fonts
Get some free fonts to write your stuff on the screen. Add those to the fonts folder.
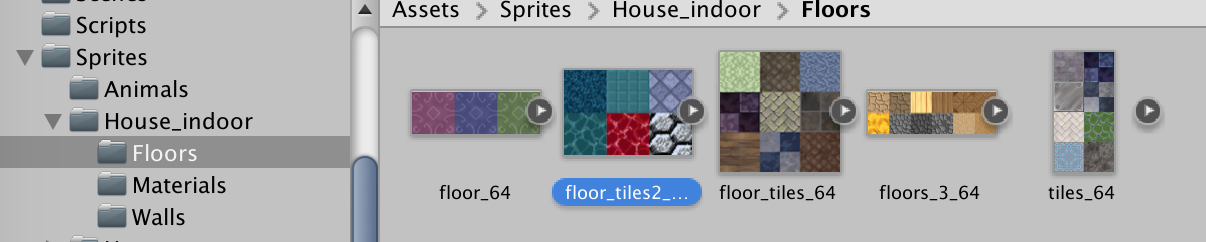
2.3 Sprites
Get some topdown tilesets, items, trees, houses and characters (animals, enemies). I worked with 64 by 64 pixels tiles.
You can also create the sprites by using something like https://www.piskelapp.com/
The player and AI characters sheets can be generated with a funny online sprite creator, here: http://gaurav.munjal.us/Universal-LPC-Spritesheet-Character-Generator/ With all possible combinations, you’ll create your very own characters.
2.4 Slicing
Most of the sprites come on sprite sheets. These sheets must be sliced in Unity 3D.
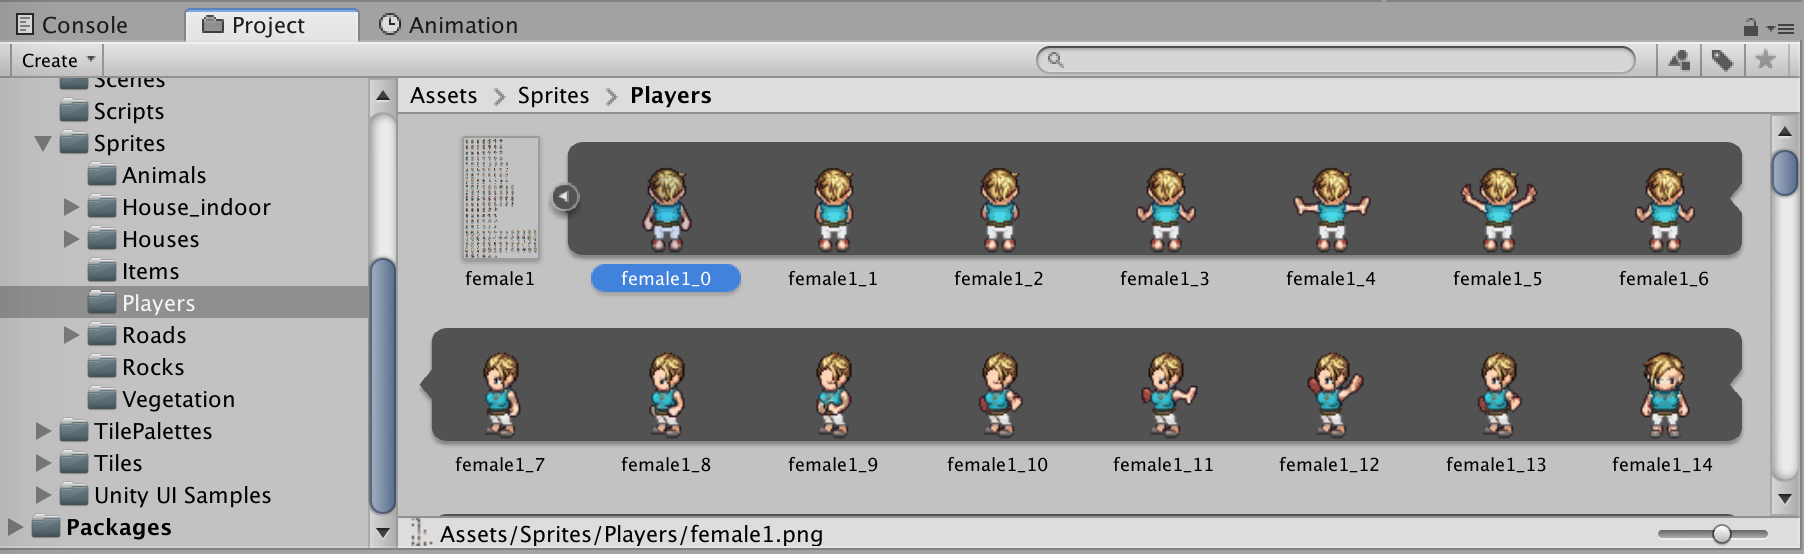
Select the sprite sheet in the project window.
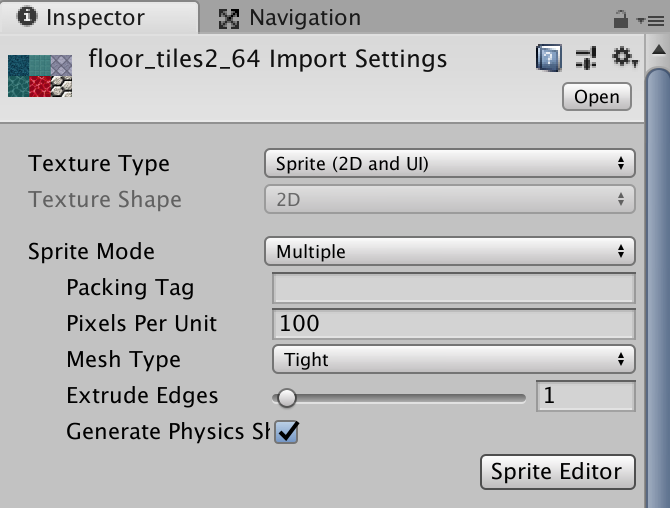
In the inspector, change the Sprite Mode from Single to Multiple and click the Sprite Editor button:
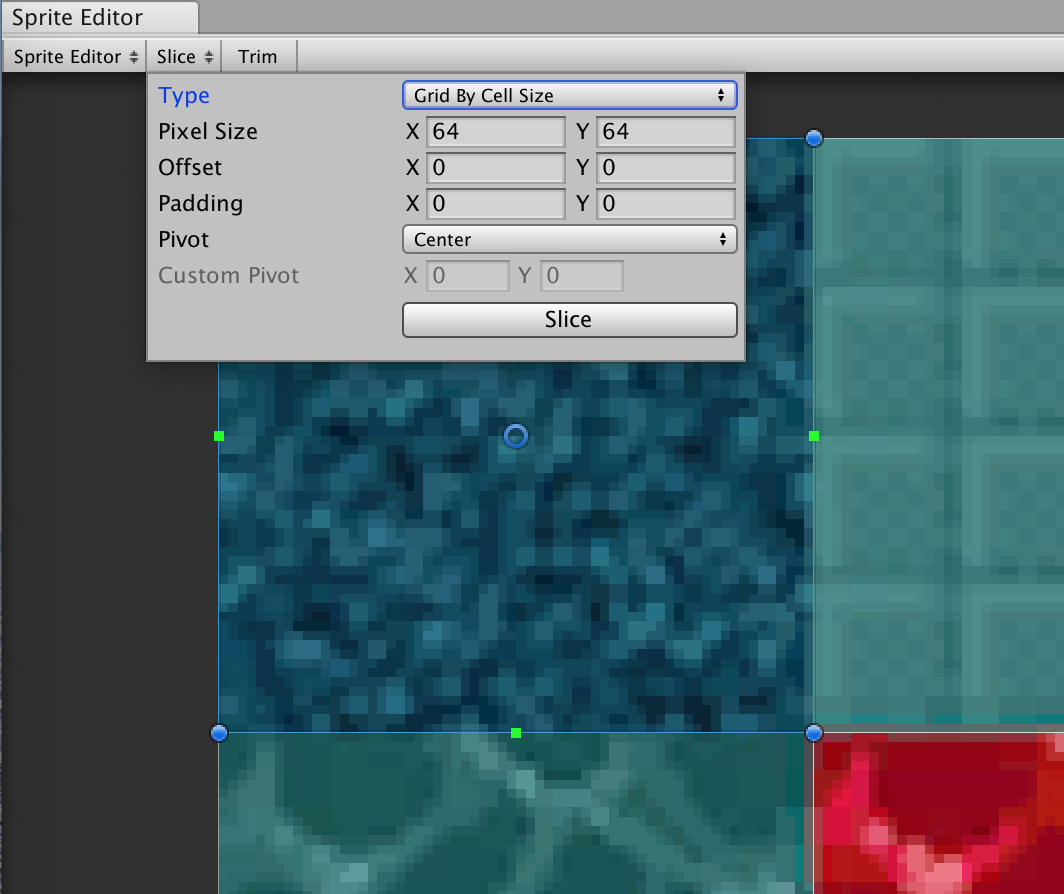
In the Slice menu, choose the Type of slicing. The best method here is to try out what works best, if you don’t know how big your sprites are; otherwise, enter the Pixel Size.
Click the Slice button and check the result. You can rename each sprite by clicking on it, but this doesn’t make sense, if you have a lot of sprites.
Once the slice window is closed, a small button appears on the right of the sprite sheet in the project window; this allows to see and access all sliced sprites:
2.5 Tile Palettes
Tile palettes are used to draw easily the base maps. It’s much faster to draw the map using a palette than drawing using the (sliced) sprites.
Open the menu Window > 2D > Tile Palette.
Create a new palette and add the sprites. Several palettes can be added.
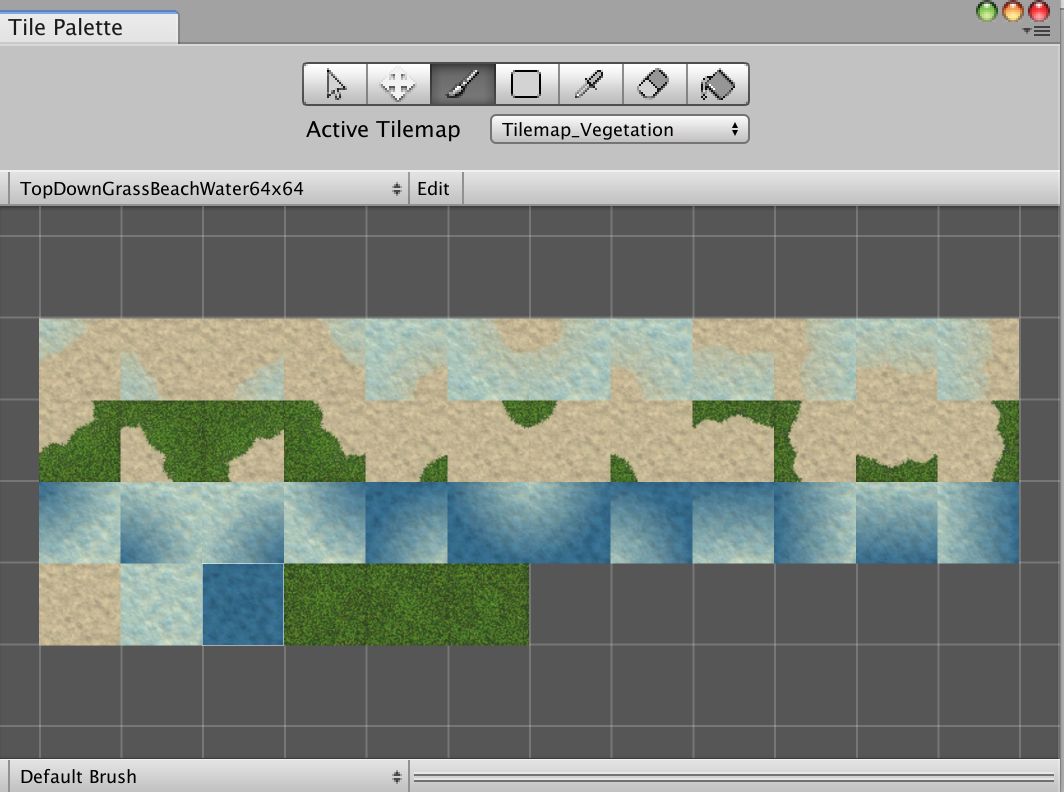
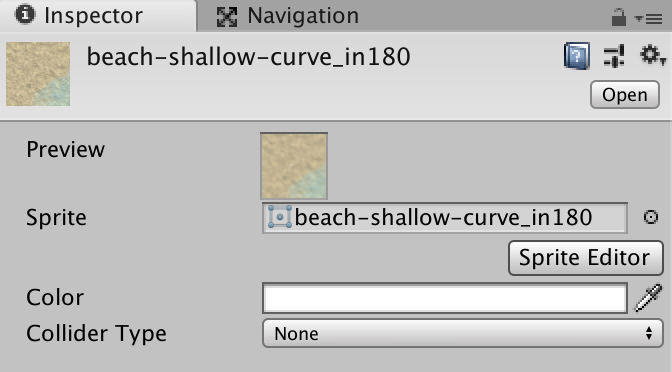
Select the created tiles

And set the Collider Type in the inspector. Floor tiles should be set to None, trees and walls to Sprite or Grid.

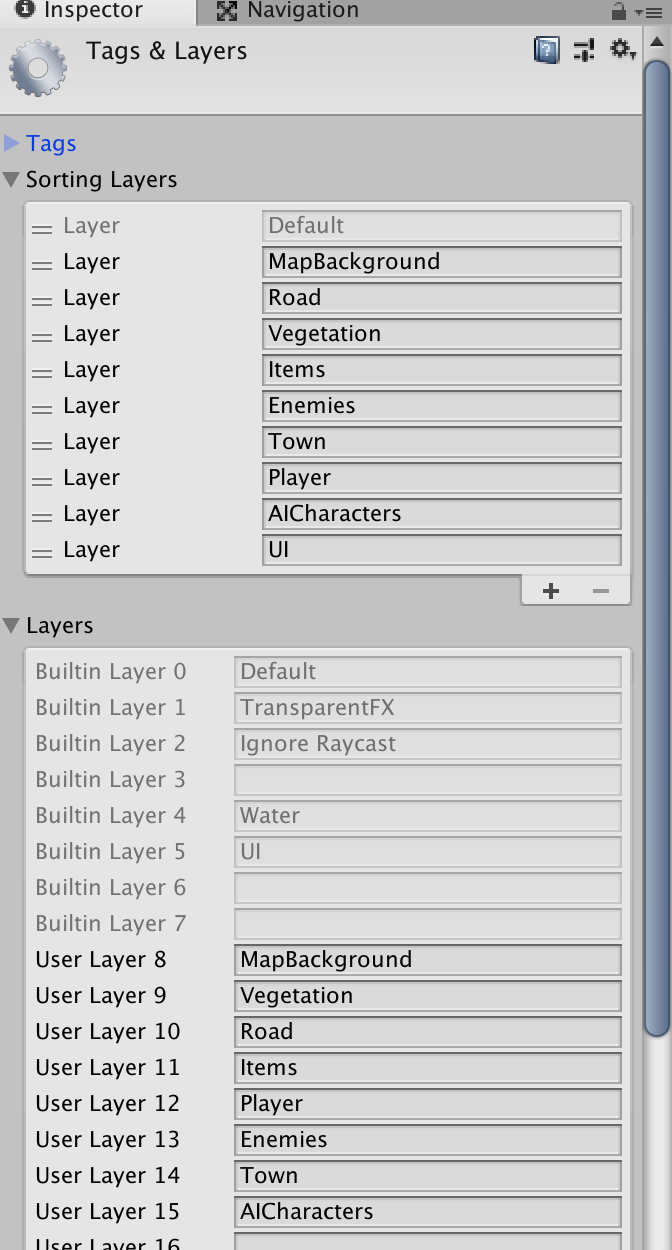
2.6 Tags and Layers
Create the missing Tags:
- MapBackground
- AICharacter
Create some Layers to store the objects. Define also the layer sort order under Sorting Layers.
2.7 Player characters
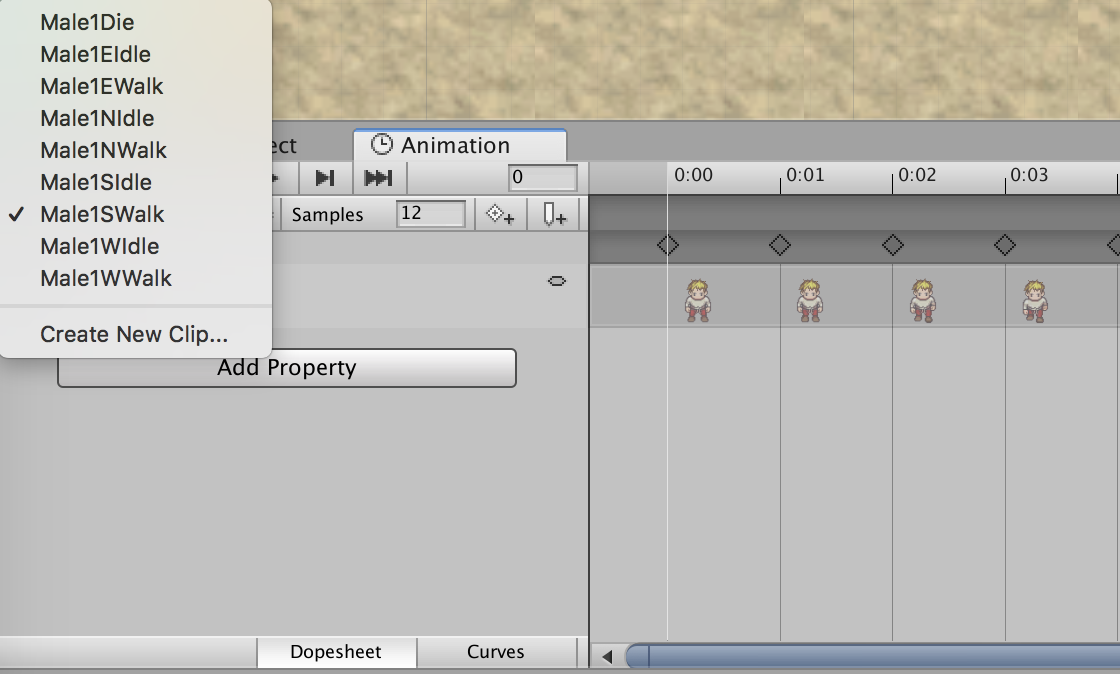
2.7.1 Create the animation clips
Add all different animations to the same GameObject (idle and walk for each direction):
- select all walk north sprites
- drag and drop those on the Hierarchy; this adds a GameObject and saves the animation clip
- select all idle north sprites
- drag and drop these on the created GameObject; this saves another animation clip to the same GameObject
- do the same with all other animations
Check the animation clips in the Animation window (menu Window > Animation > Animation).
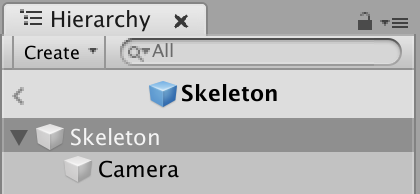
Add a Camera as a child of the character. This will allow to move the camera when the player is moving.
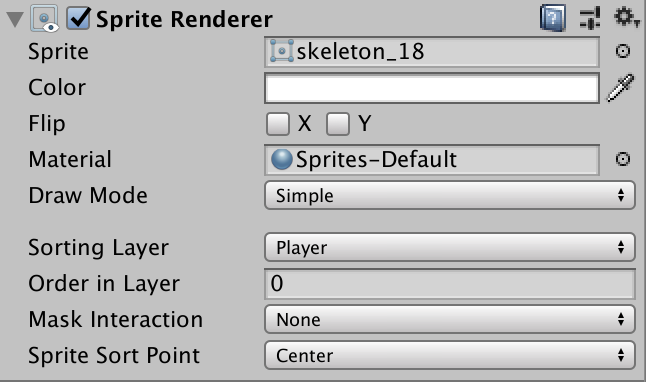
In the inspector, under Sprite Renderer, set the Sorting Layer to Player.
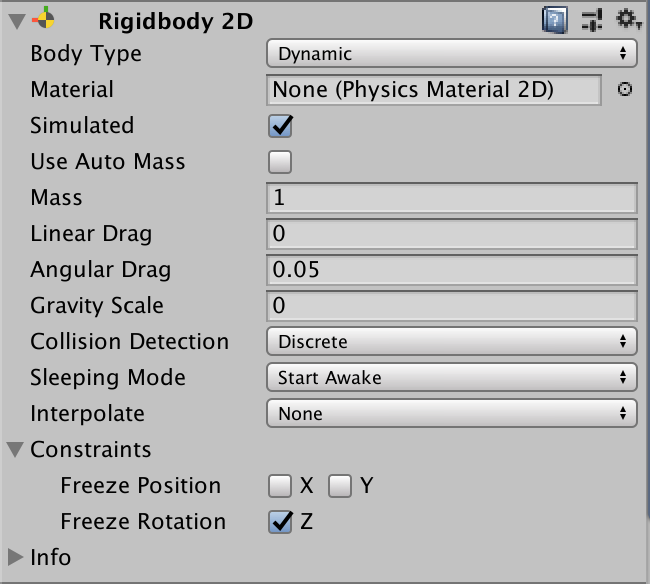
Add a Rigidbody 2D component. Set the Gravity Scale to 0 (as we build a topdown game) and, under Constraints, freeze the rotation on Z (otherwise you may encounter the spinning world effect).
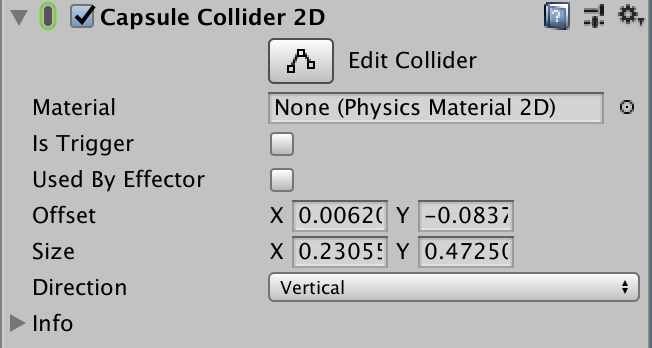
Add a Collider 2D component. This is used to interact with other GameObject like items or animals.
Right now, our character has animation clips, but it doesn’t play any animation or movements. For these, we need to use the Animator and to do some scripting.
Open the menu Window > Animation > Animator.
Now we consider two solutions:
- a normal animation state machine (boy character in this example)
- an animation state machine using blend trees in 2D mode (girl and skeleton characters)
In this tutorial, we show both solution, even if the animations when working with blend trees is much better.
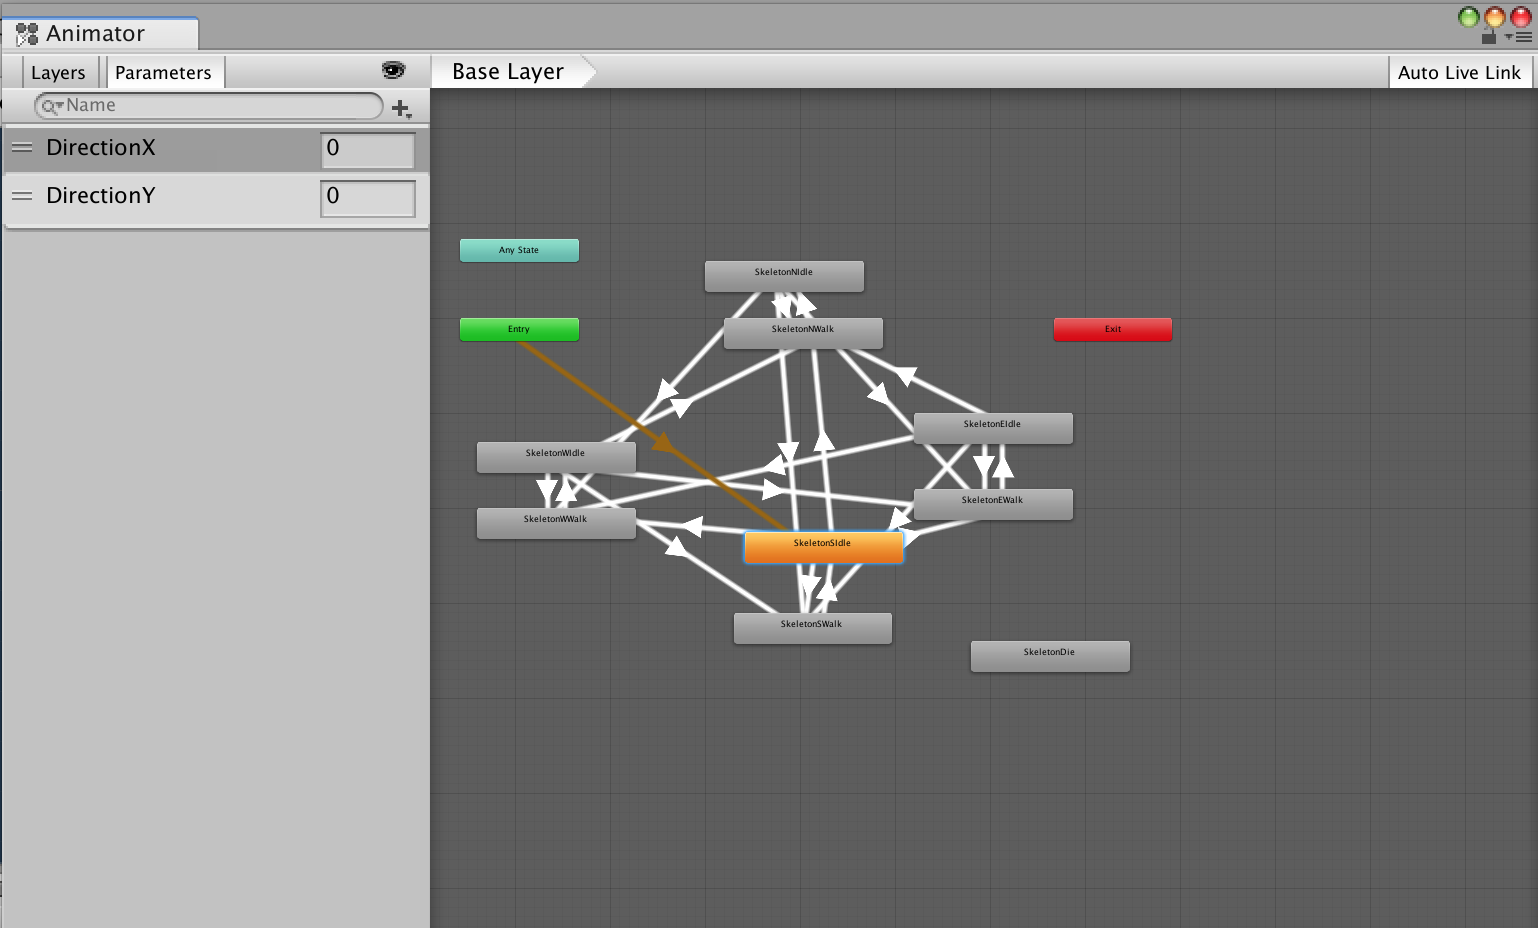
2.7.2 Normal animation state machine
Here we use the easiest way (at first sight) to link the animations by defining all needed transitions.
Add two integer parameters, DirectionX and DirectionY.
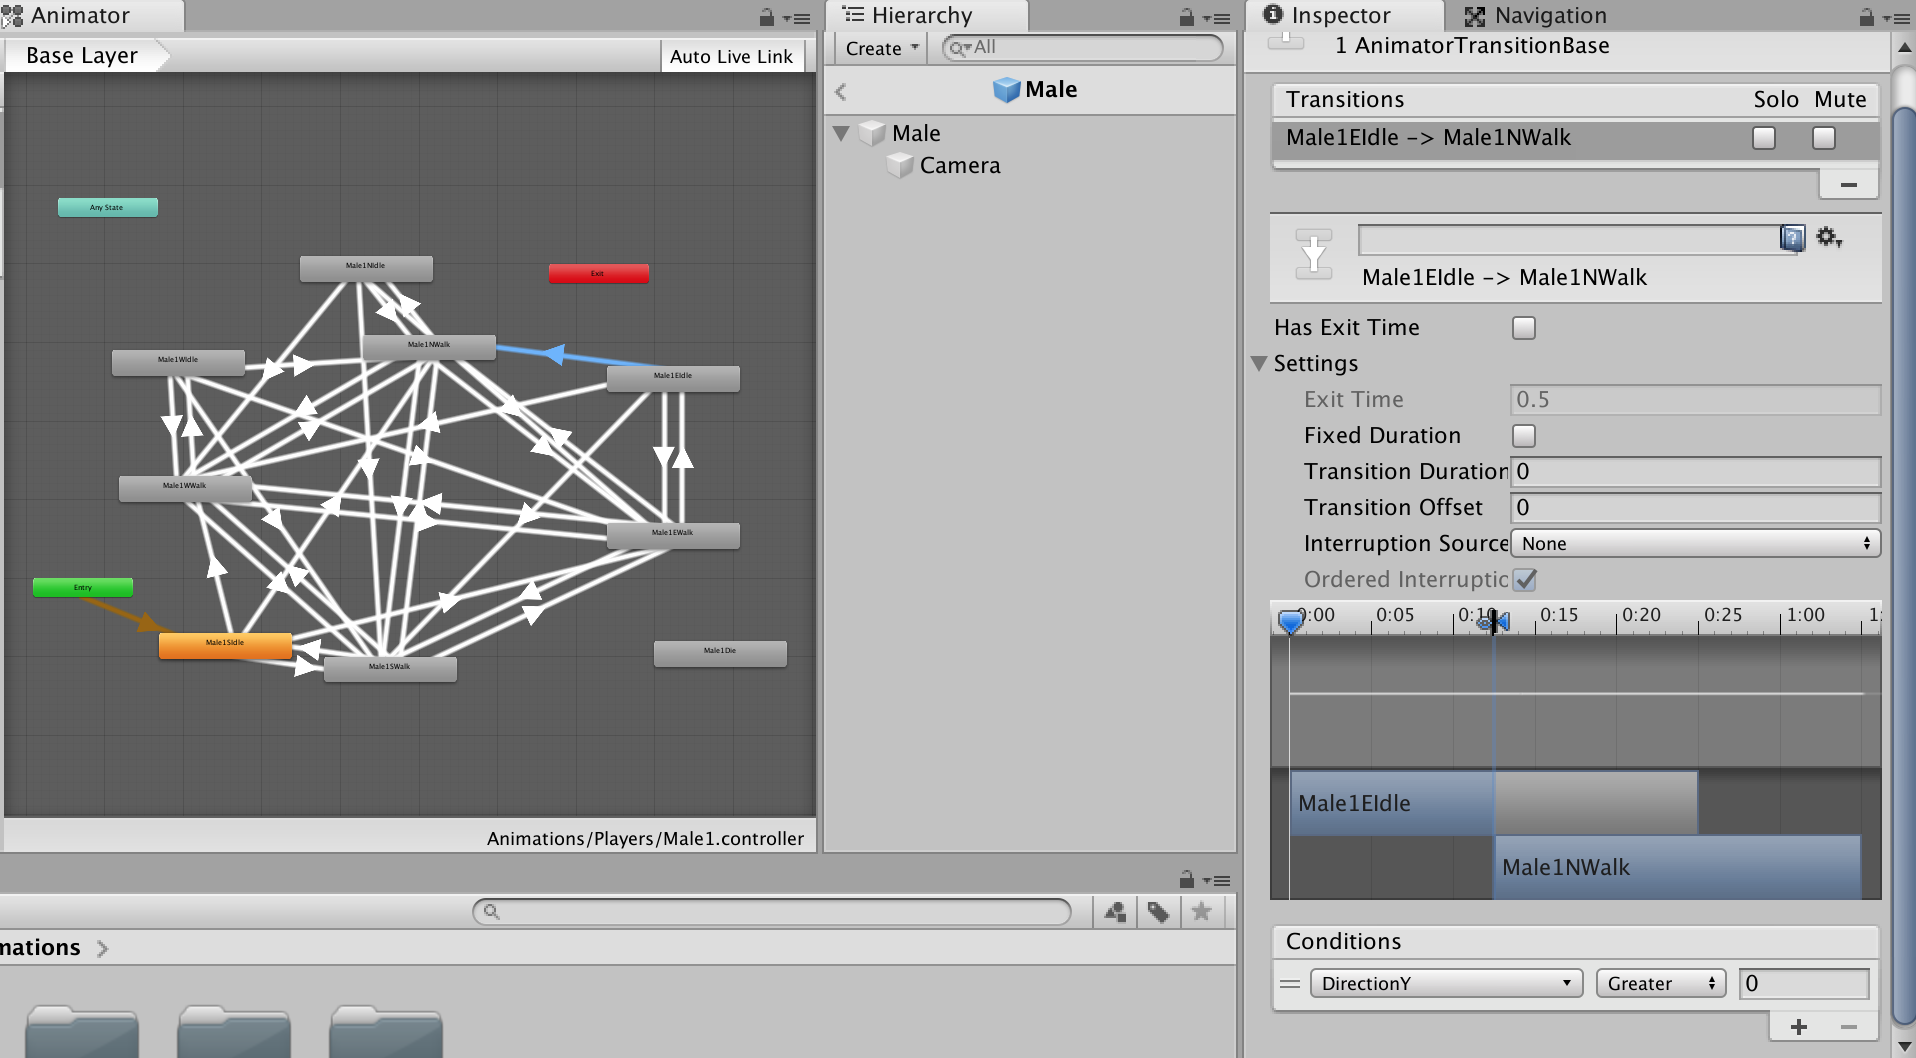
For each transition, define the following in the Inspector:
- uncheck Has Exit Time
- under Settings, uncheck Fixed Duration
- under Settings, set Transition Duration to 0
- define the conditions (e.g. EastIdle > WalkNorth ≡ DirectionY > 0, WalkNorth > IdleNorth ≡ DirectionX = 0 & DirectionY = 0)
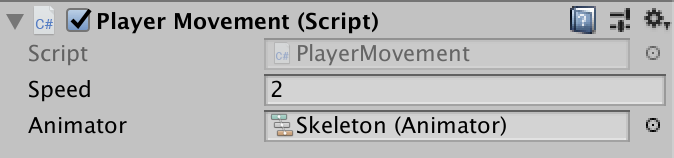
Create a new PlayerMovement script and attach it to the GameObject.
Add this code:
using System.Collections;
using System.Collections.Generic;
using UnityEngine;
public class PlayerMovement : MonoBehaviour
{
[SerializeField]
private float speed;
[SerializeField]
private Animator animator;
void FixedUpdate()
{
float moveHorizontal = Input.GetAxis("Horizontal");
float moveVertical = Input.GetAxis("Vertical");
Vector2 currentVelocity = gameObject.GetComponent<Rigidbody2D>().velocity;
float newVelocityX = 0f;
if (moveHorizontal < 0 && currentVelocity.x <= 0)
{
newVelocityX = -speed;
animator.SetInteger("DirectionX", -1);
}
else if (moveHorizontal > 0 && currentVelocity.x >= 0)
{
newVelocityX = speed;
animator.SetInteger("DirectionX", 1);
}
else
{
animator.SetInteger("DirectionX", 0);
}
float newVelocityY = 0f;
if (moveVertical < 0 && currentVelocity.y <= 0)
{
newVelocityY = -speed;
animator.SetInteger("DirectionY", -1);
}
else if (moveVertical > 0 && currentVelocity.y >= 0)
{
newVelocityY = speed;
animator.SetInteger("DirectionY", 1);
}
else
{
animator.SetInteger("DirectionY", 0);
}
gameObject.GetComponent<Rigidbody2D>().velocity = new Vector2(newVelocityX, newVelocityY);
}
}
Back in the Inspector, set the values:
Create a character’s prefab.
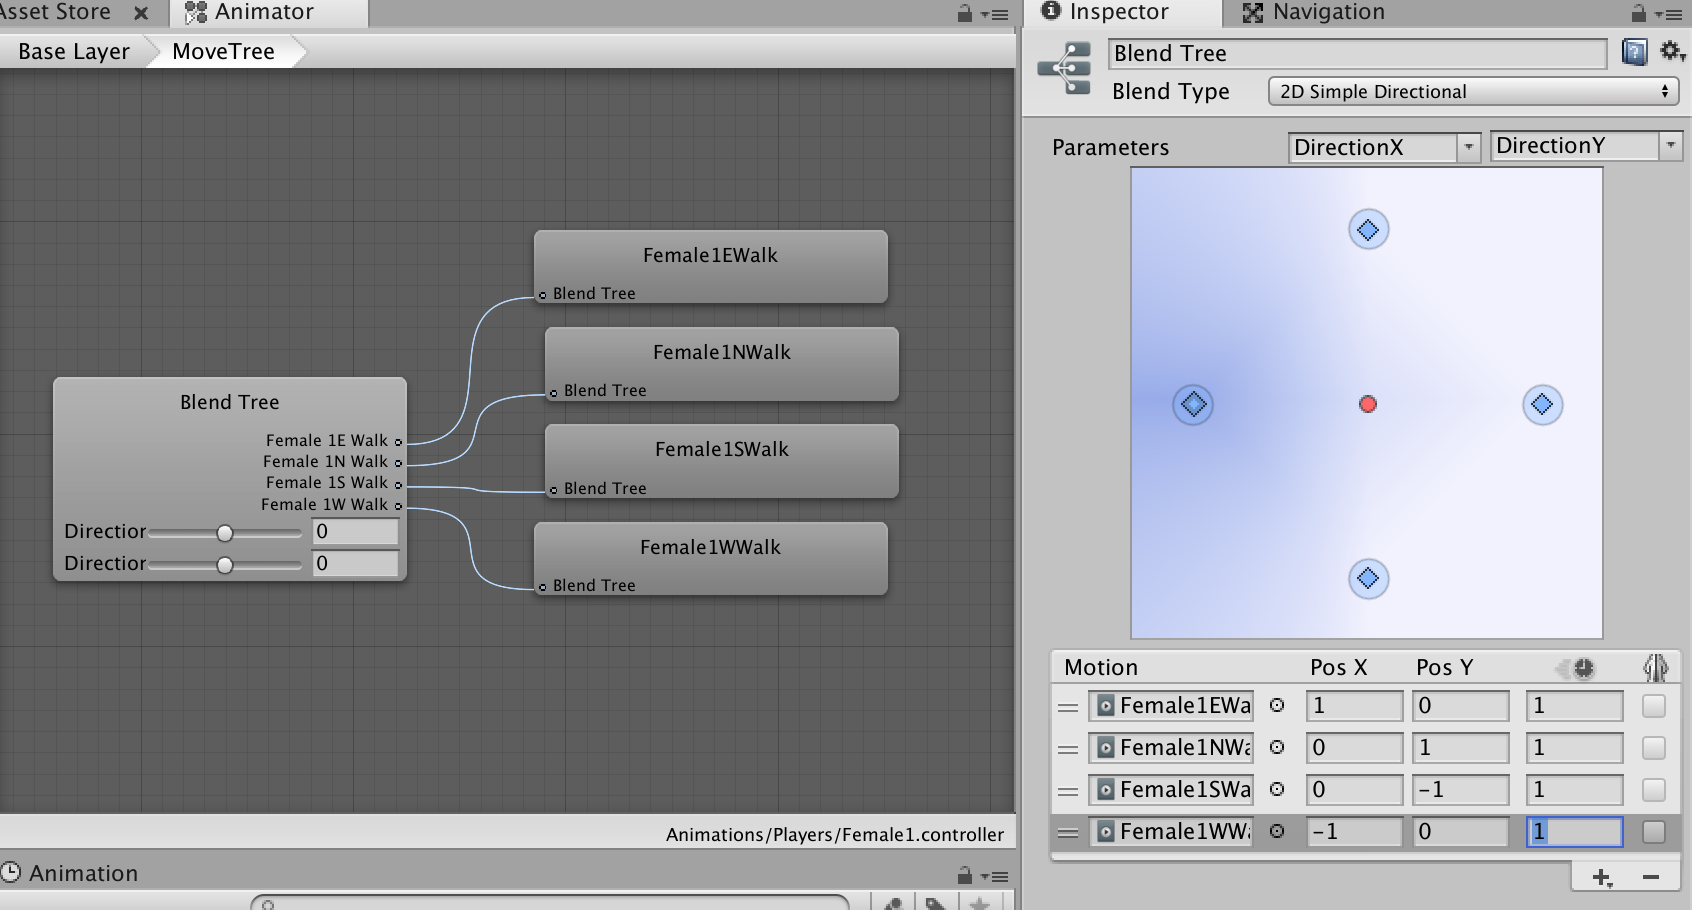
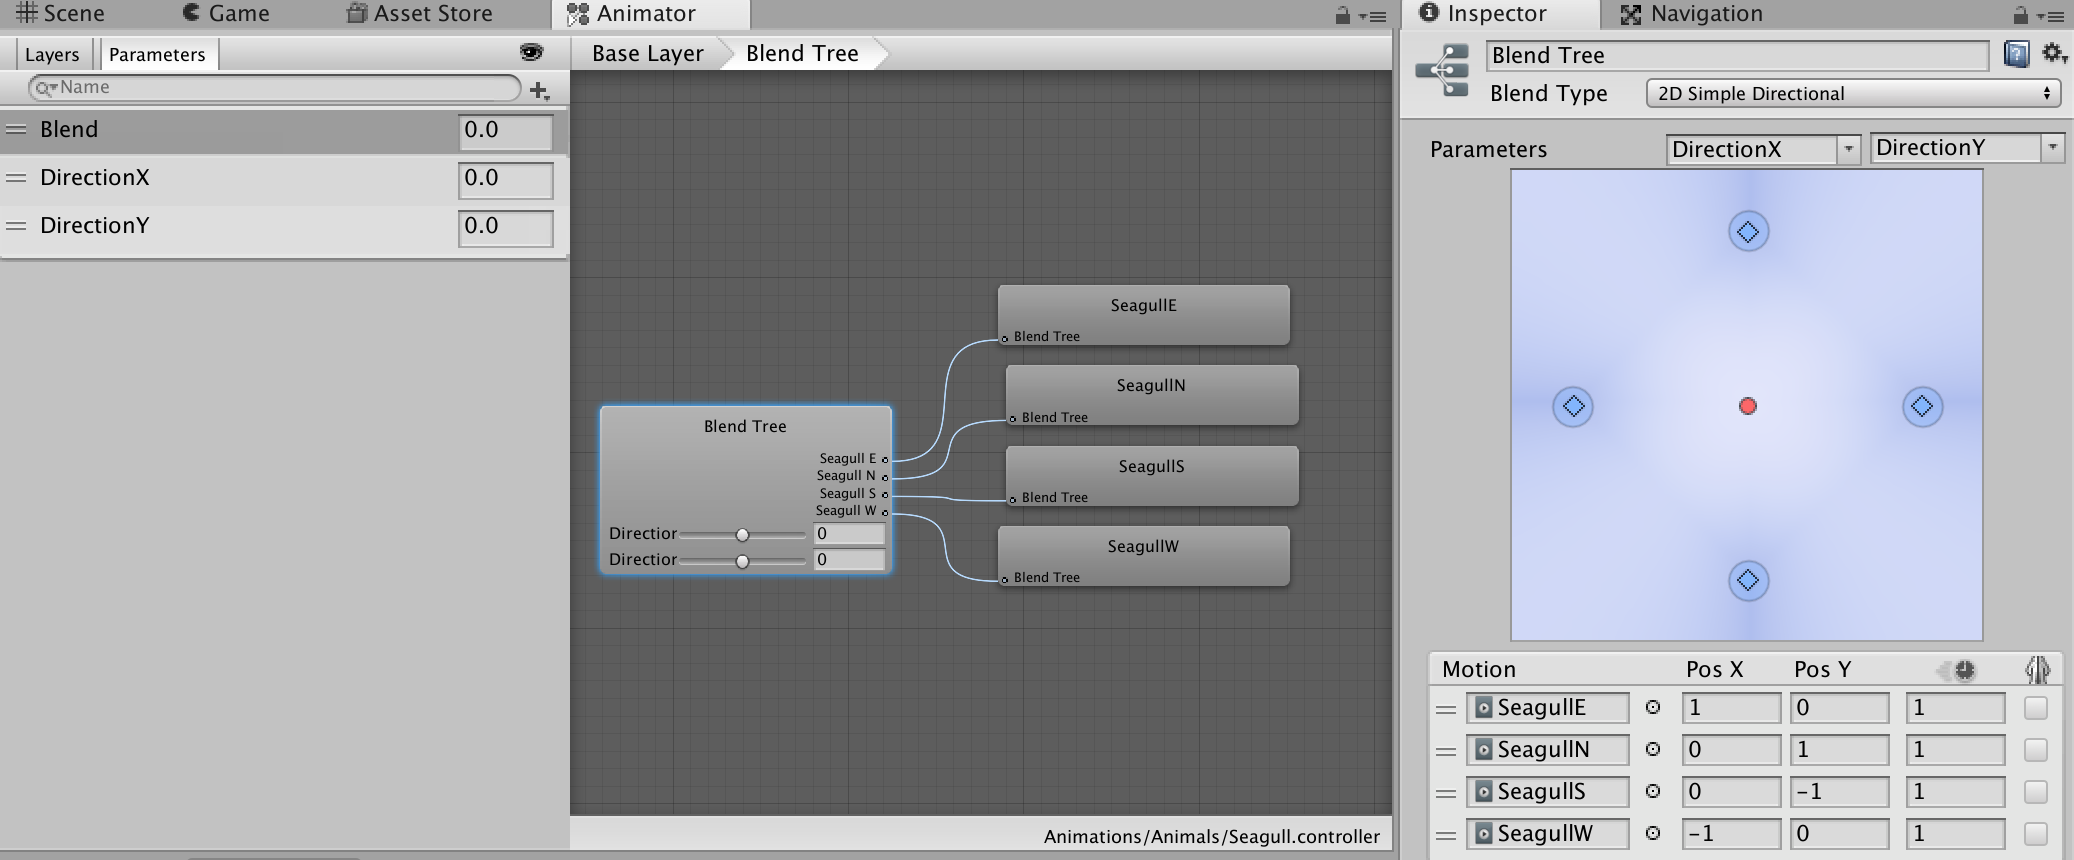
2.7.3 Animation state machine using blend trees
In the Project window, delete the Animation Controller that was created while adding the animation clips. Create a new one using the context menu Create > Animation Controller and name it.
In the Animator window, create two new states from new Blend Trees
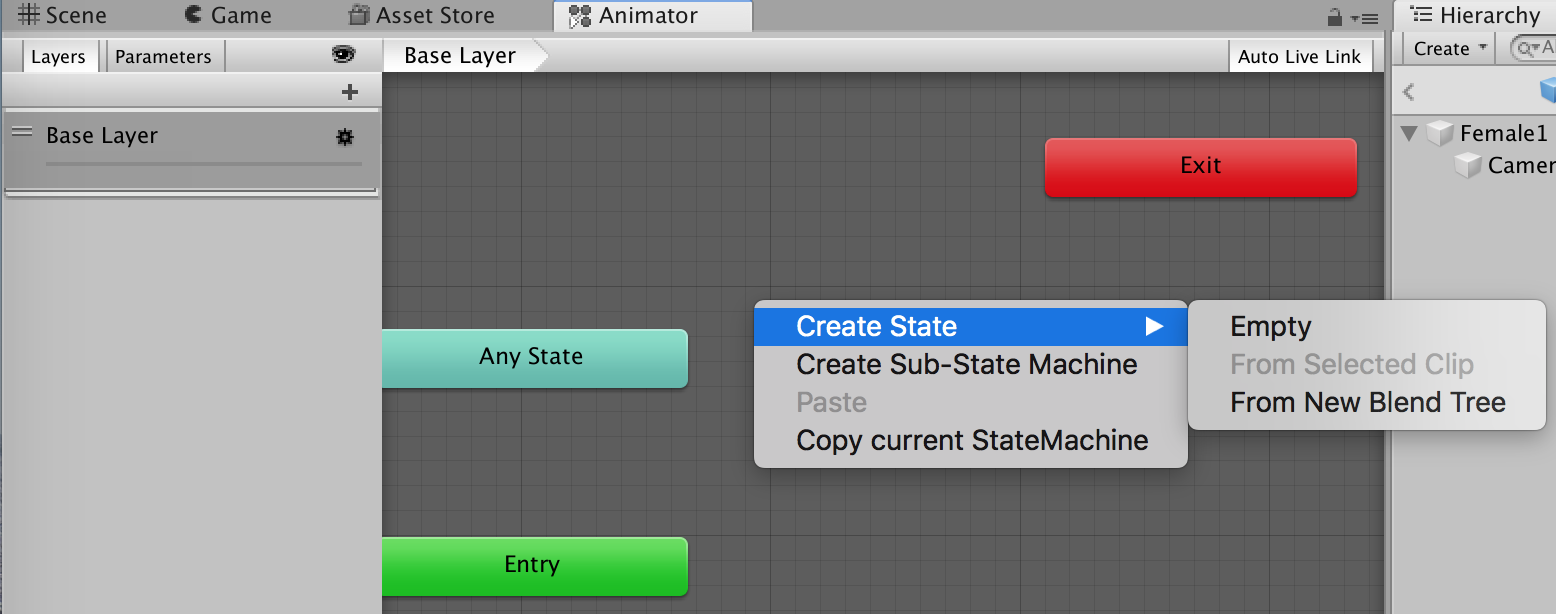
Rename the blend trees in the Inspector, IdleTree and MoveTree. The idea is to have a blend tree for all idle clips and another one for all movement clips.

In this case, we will have only two transitions to handle, between idle and movement. To define these, we need a boolean parameter:
Create the two transitions and set the settings and conditions like below

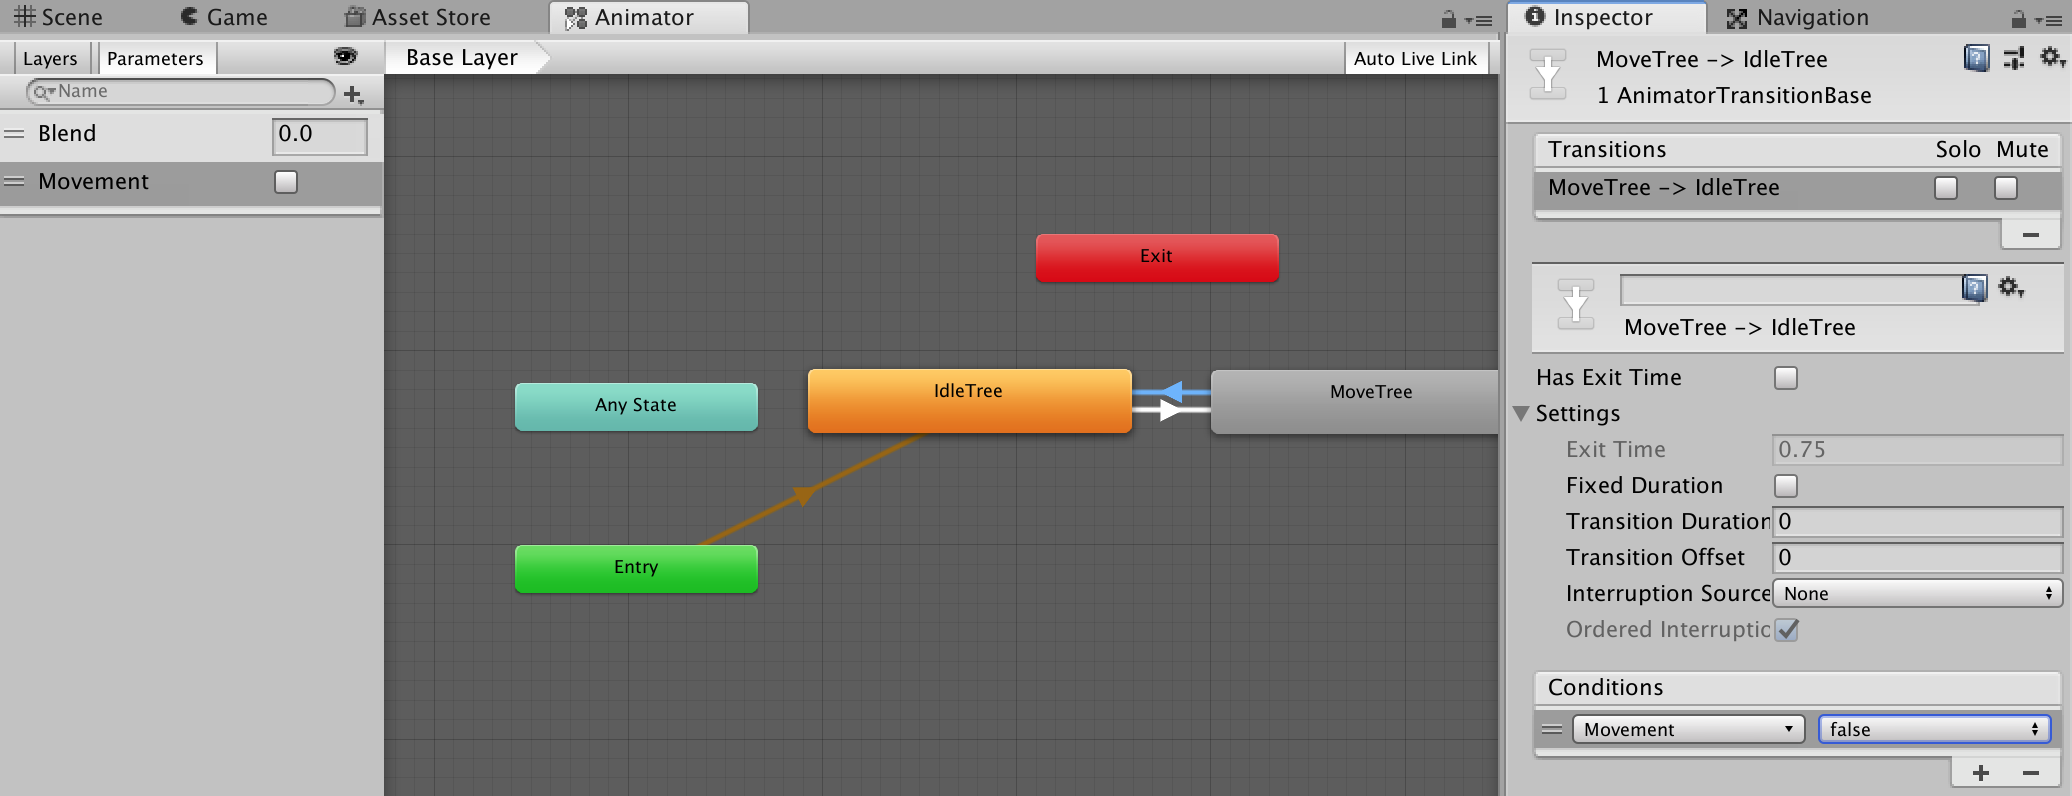
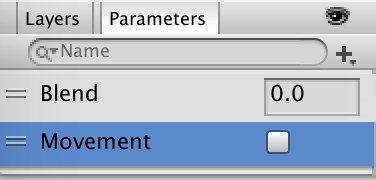
Create 4 new float parameters:
- DirectionX
- DirectionY
- LastDirX
- LastDirY
The “LastDir” parameters will be used to know which idle clip we have to use.
Let’s define the blend trees.
Double-clic on IdleTree:
- set the Blend Type to 2D Simple Directional
- set the Parameters to LastDirX and LastDirY
- under Motion, add 4 items
- for each motion, add an idle clip (up, down, right, left) and set the PosX and PosY values
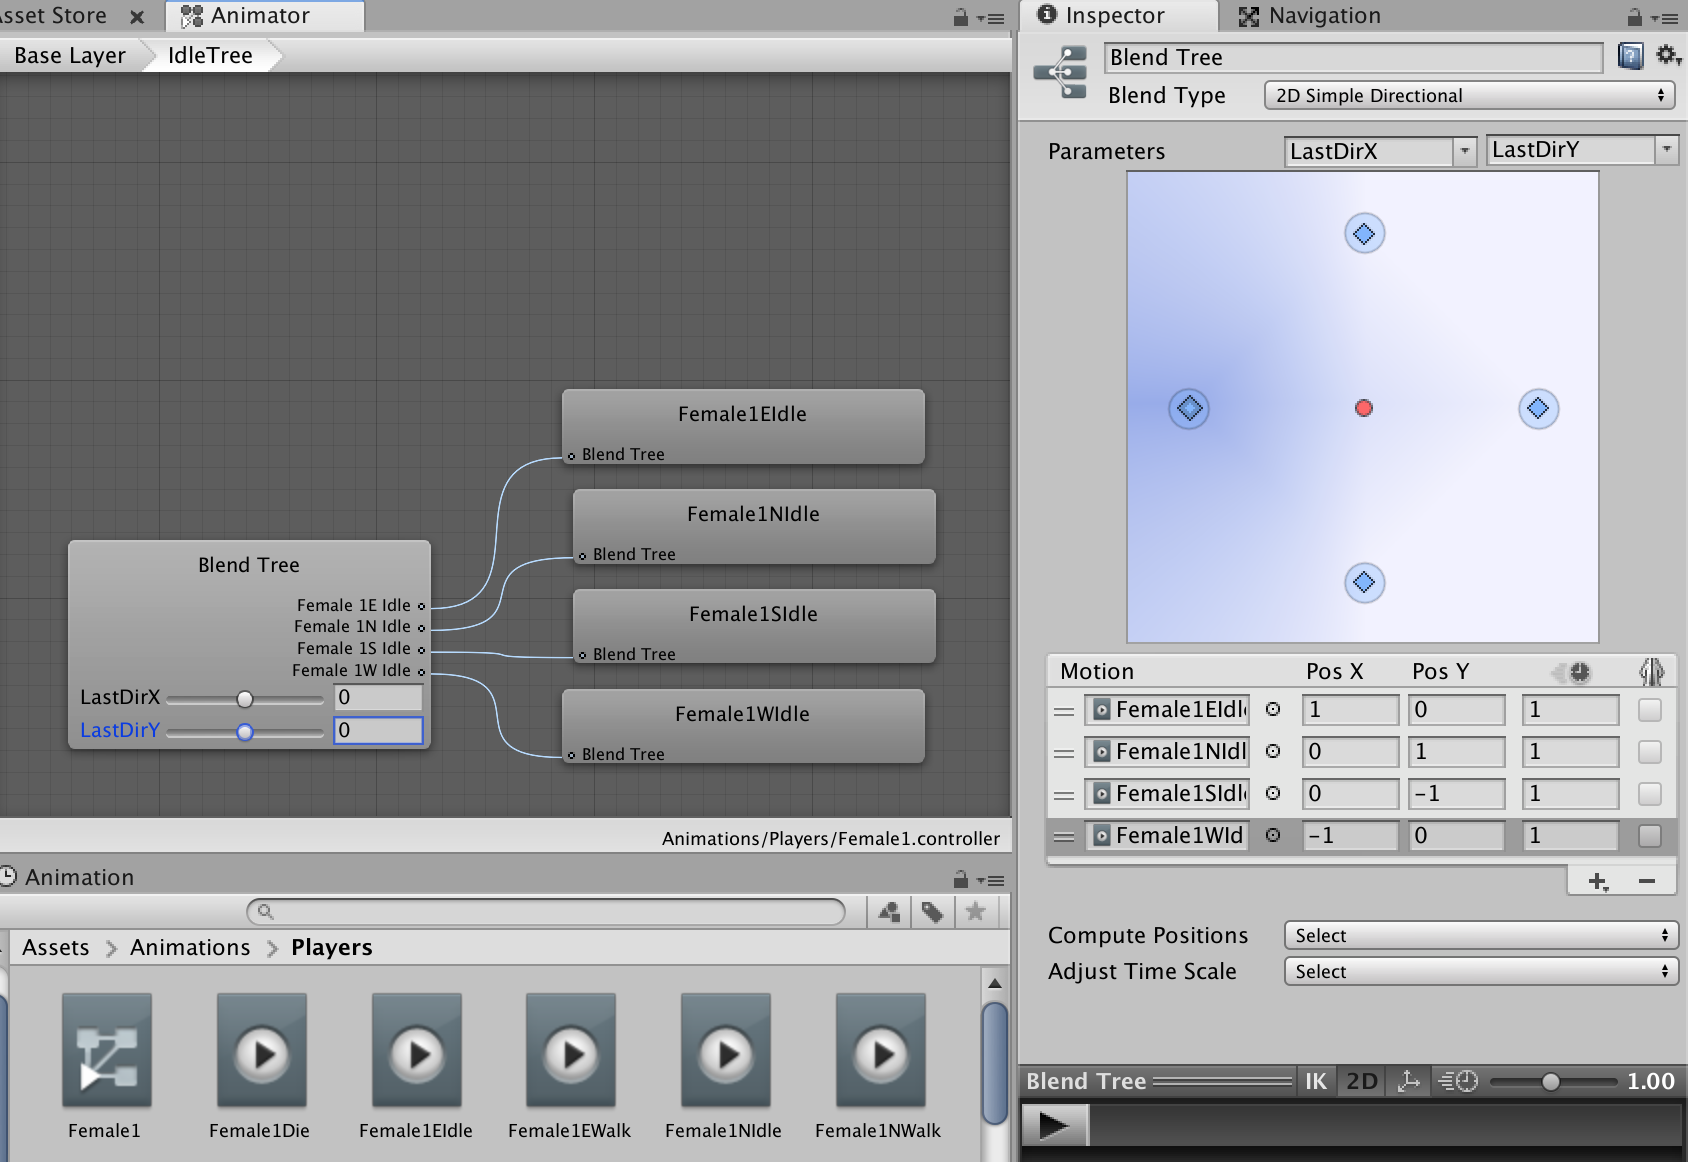
Go back to the Base Layer and do the same with MoveTree.
Back in the Scene view, check if the player GameObject has already an Animator component. If one exists, delete it. Drag and drop the newly created controller from the project window to the inspector: this adds a new animator component.
Create a new PlayerBlendMovement script and add it to the player.
Add this code:
using System.Collections;
using System.Collections.Generic;
using UnityEngine;
public class PlayerBlendMovement : MonoBehaviour
{
//Movement variables
public float MoveSpeed = 4f;
//Animation variables
Animator thisAnim;
float lastX, lastY;
// Start is called before the first frame update
void Start()
{
thisAnim = GetComponent<Animator>();
}
// Update is called once per frame
void Update()
{
Move();
}
void Move()
{
Vector3 rightMovement = Vector3.right * MoveSpeed * Time.deltaTime * Input.GetAxis("Horizontal");
Vector3 upMovement = Vector3.up * MoveSpeed * Time.deltaTime * Input.GetAxis("Vertical");
Vector3 heading = Vector3.Normalize(rightMovement + upMovement);
transform.position += rightMovement;
transform.position += upMovement;
UpdateAnimation(heading);
}
void UpdateAnimation(Vector3 dir)
{
if((dir.x == 0f) && (dir.y == 0f))
{
//idle animation if no key pressed
thisAnim.SetFloat("LastDirX", lastX);
thisAnim.SetFloat("LastDirY", lastY);
thisAnim.SetBool("Movement", false);
}
else
{
lastX = dir.x;
lastY = dir.y;
thisAnim.SetBool("Movement", true);
}
thisAnim.SetFloat("DirectionX", dir.x);
thisAnim.SetFloat("DirectionY", dir.y);
}
}
2.8 AI characters and other animated objects
I created some simple animated AI characters and animals to have some more animation on the screen. Those objects were saved as prefabs as well.
Right now, these objects don’t move on the world.
3. Build the world
3.1 The tilemaps
It’s a good idea to create several tilemaps:
- world tilemap
- indoor tilemap
- plants tilemap
- roads and rocks tilemap
This allows to handle the backgrounds.
3.1.1 The world tilemap
The world tilemap contains the world information like water, beach, grass.
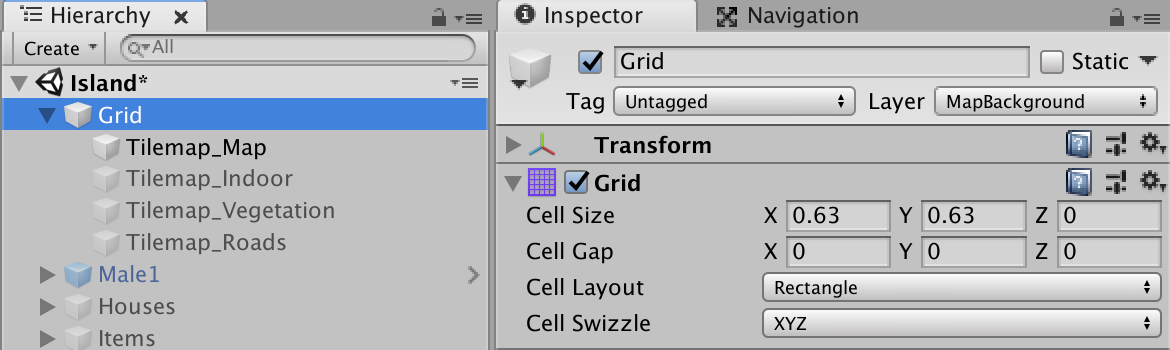
First of all, create a new tilemap in the Hierarchy with the context menu 2D Object > Tilemap.
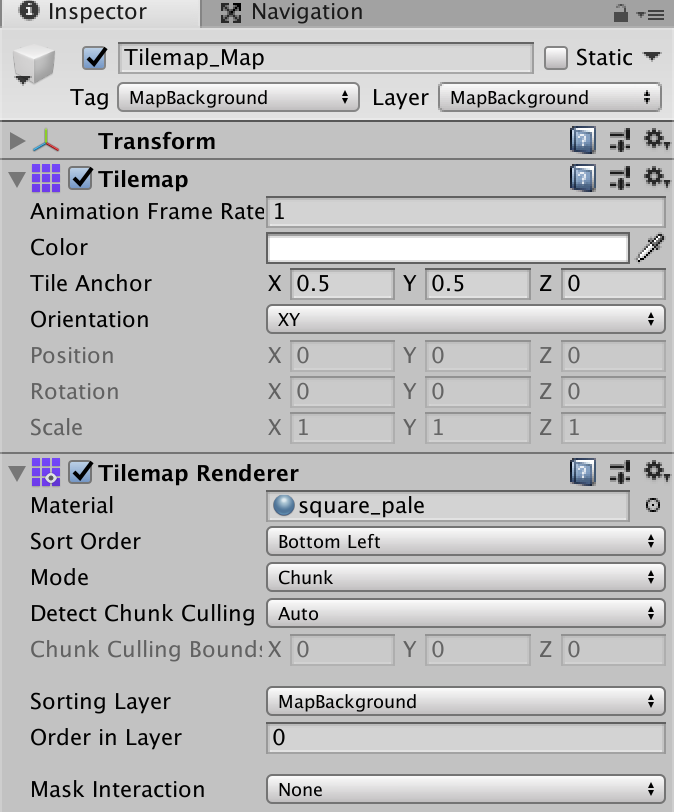
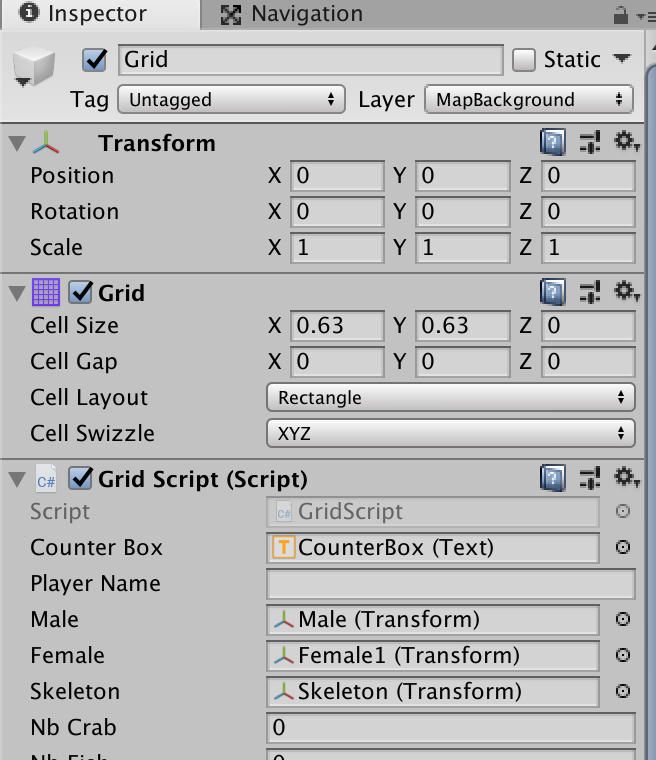
This adds a Grid and a Tilemap. Rename the tilemap to Tilemap_Map.
Set the Grid’s Layer to MapBackground.
In the Grid, under Grid, set the Cell Size to your sprites’ size.
In the Tilemap_Map, under Tilemap Renderer, set the Sorting Layer to MapBackground.
Open the Tile Palette window, choose the Active Tilemap and the tile palette.
Select a tool and a tile and draw your world.
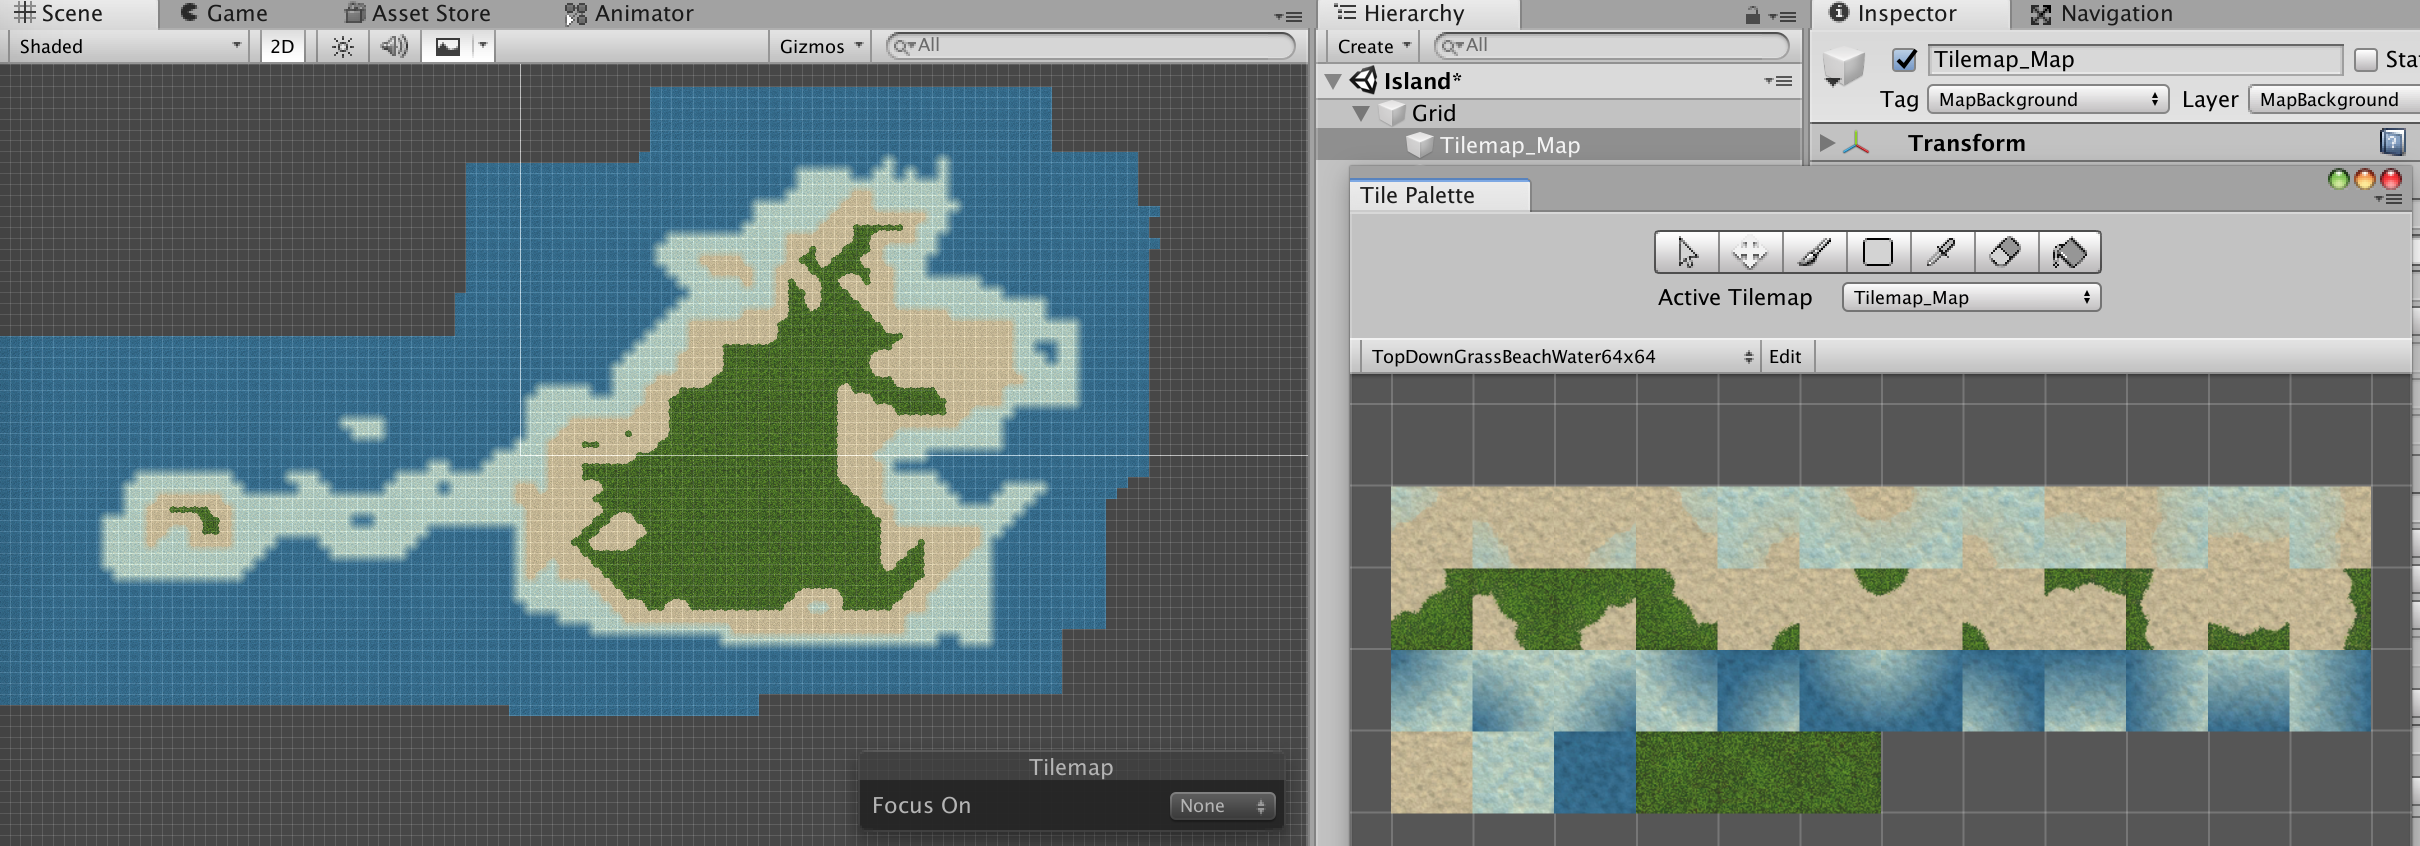
You may have noticed that there’s a lot of water around the island. Right now, the player is able to walk on the water. To avoid, we need some stuff:
- check that the water tile has a collider (as explained in a previous chapter)
- add a new Tilemap Collider 2D to the tilemap
- add a Composite Collider 2D to the tilemap
- tell the Tilemap Collider 2D to use the Composite Collider 2D
- add an Edge Radius to the Composite Collider 2D to smooth the composite collider borders.
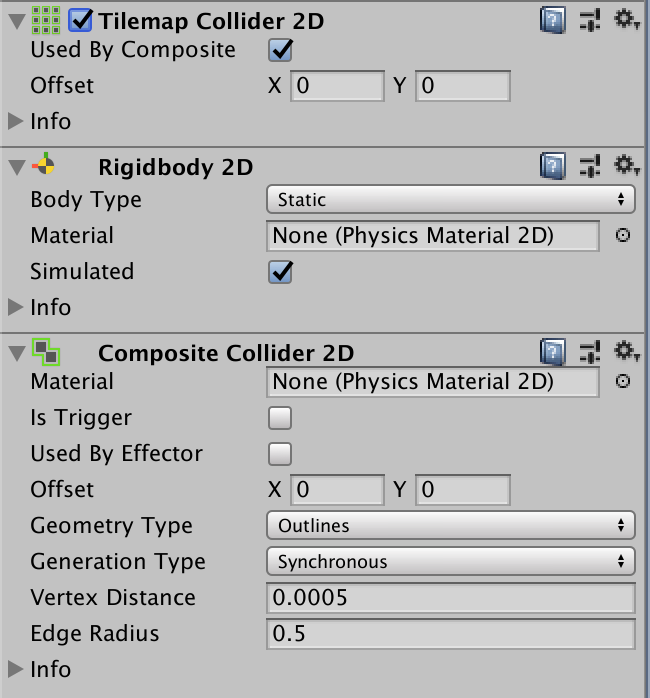
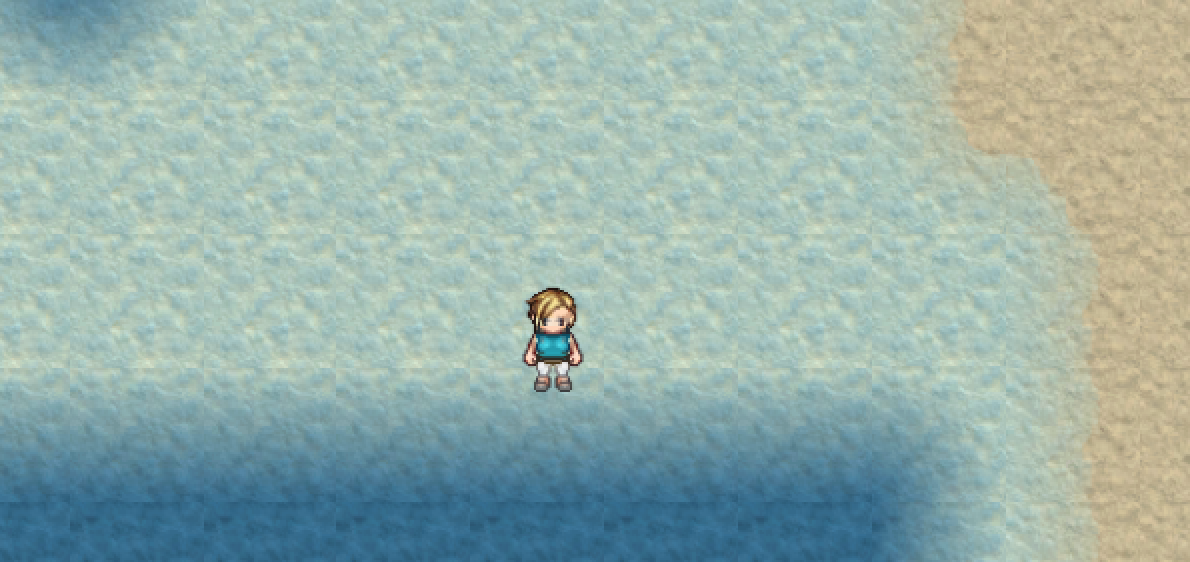
Now the player can enter the swallow water, but not the deep one.
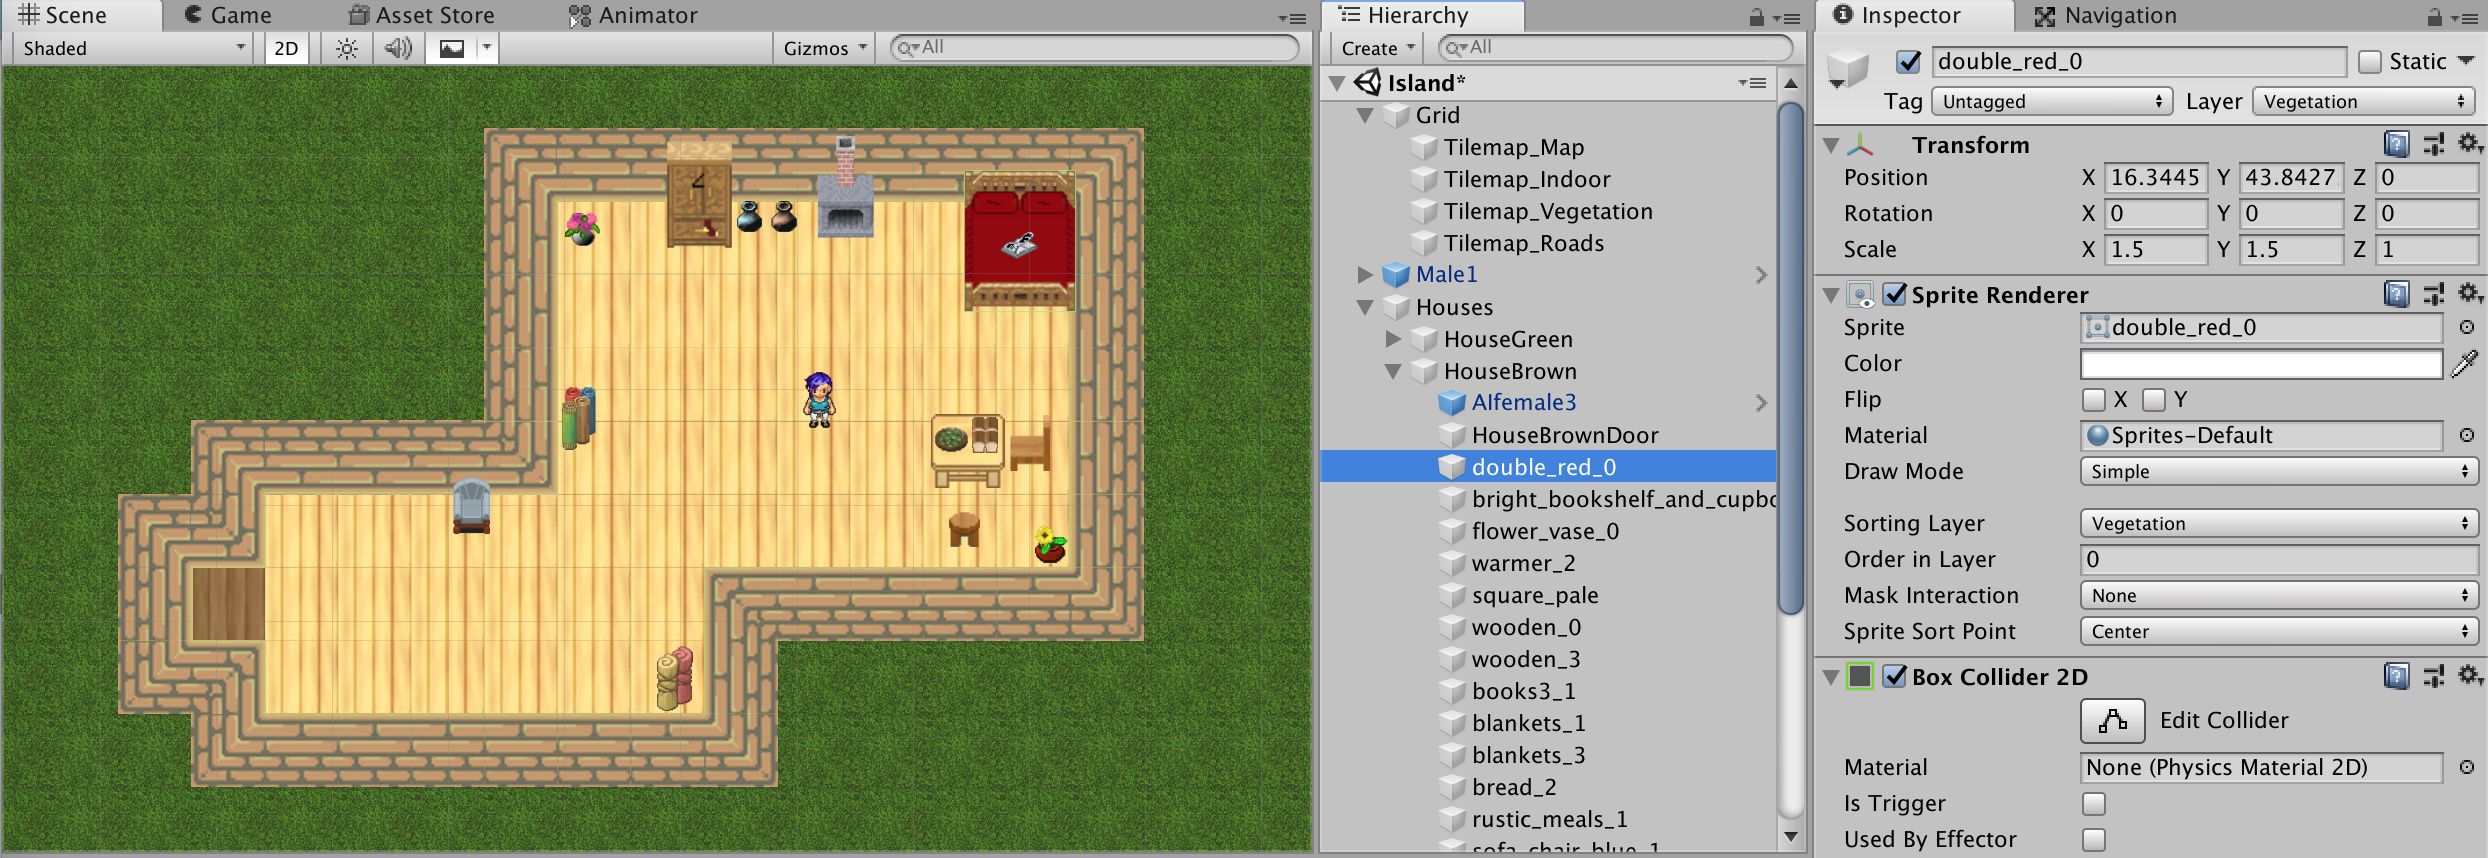
3.1.2 The indoor tilemap
The indoor tilemap contains the houses indoor information like walls, floors.
In the Hierarchy, select the existing Grid and create a new Tilemap named Tilemap_Indoor. The new tilemap is created as a child of the grid, as the indoor sprites have the same grid size than the world sprites.
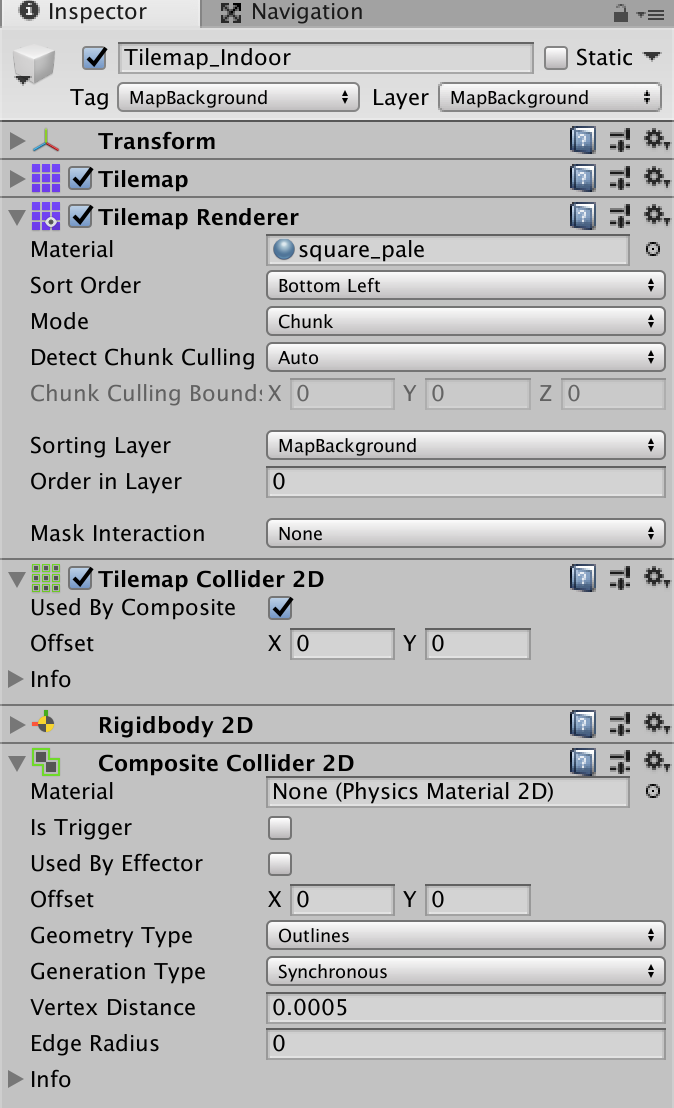
This time, we draw on the Tilemap_Indoor using several tile palettes (like Walls, Floors).

Important note:
The houses’ plans have to be draw somewhere else than our world. The player will be teleported from one location to the other by script. So everything is drawn in the same scene.
Another solution could be to have multiple scenes, but then you need to handle the player’s items through multiple scenes.
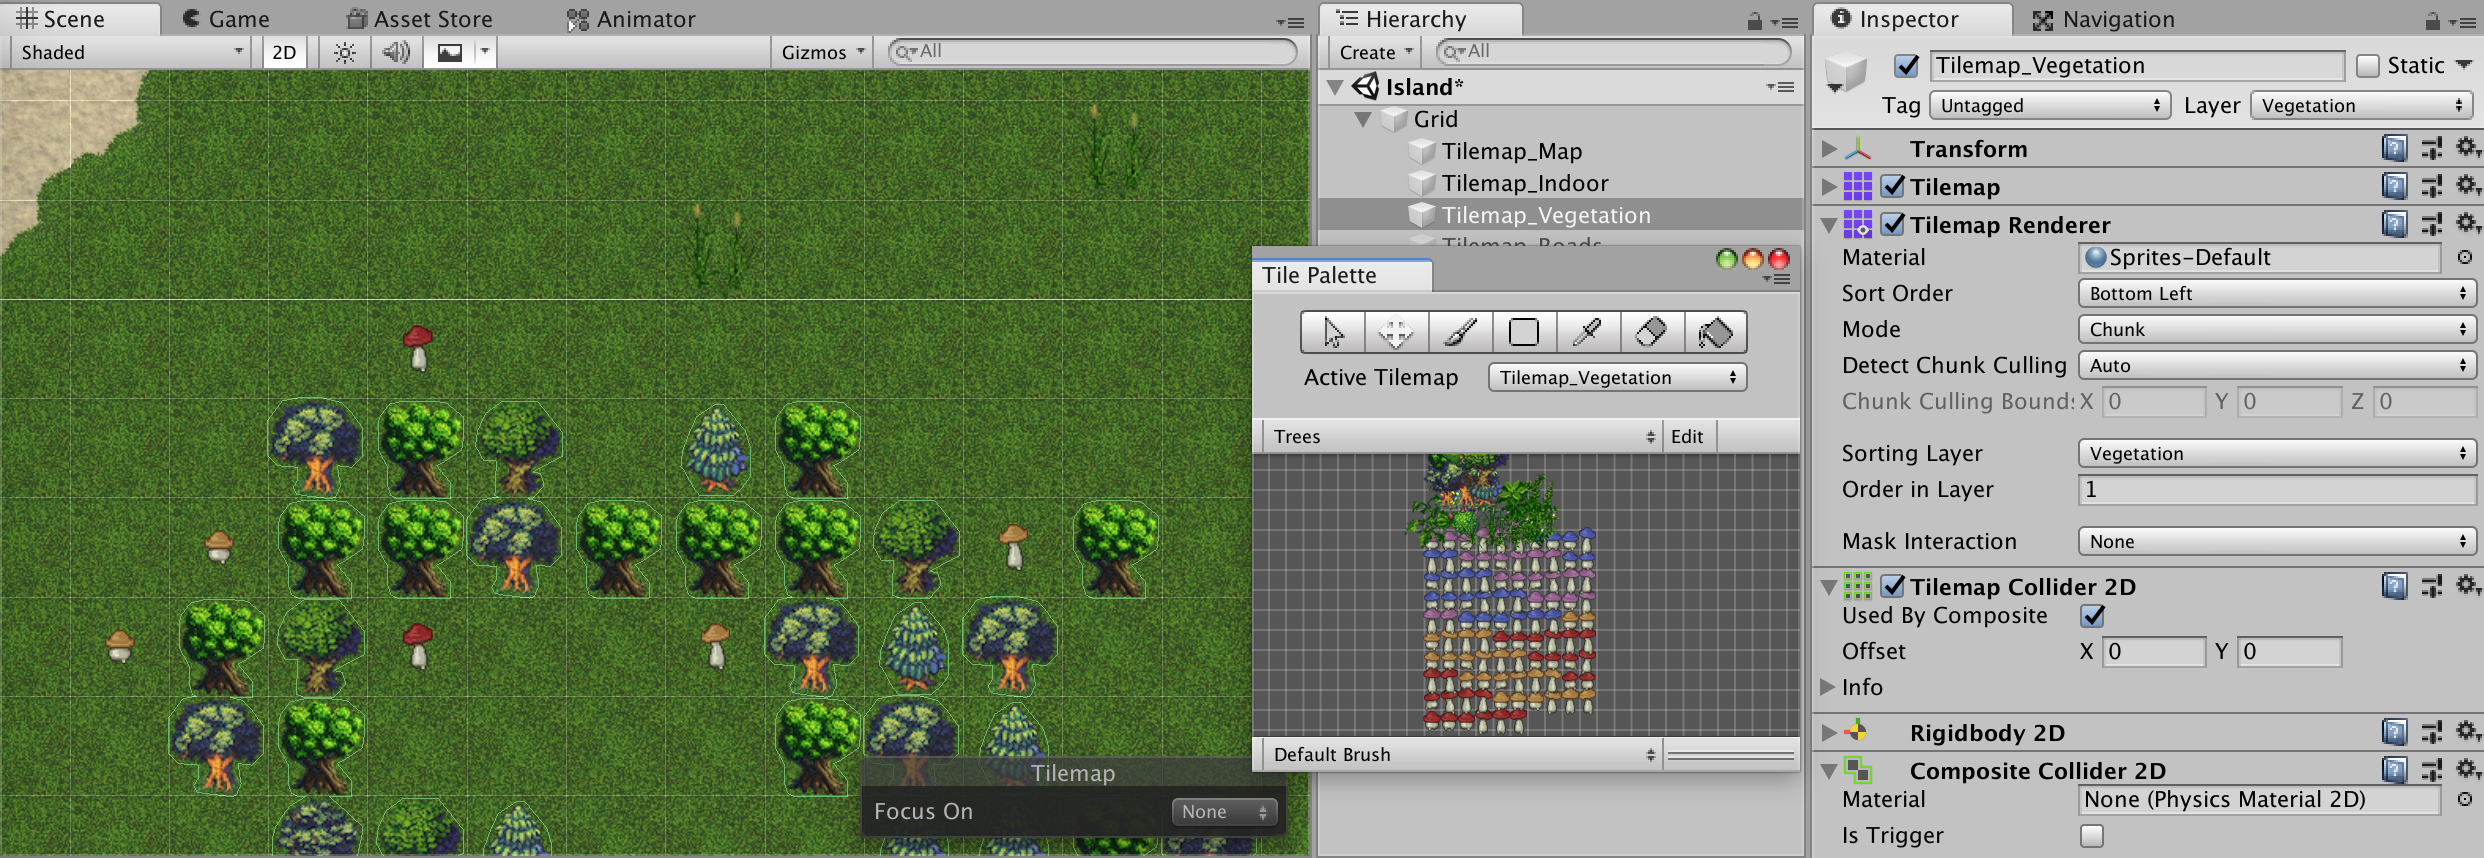
3.1.3 The plants tilemap
The plants tilemap contains the trees and plants information.
In the Hierarchy, select the existing Grid and create a new Tilemap named Tilemap_Plants. The new tilemap is created as a child of the grid.
Some tiles are like walls (trees) and need a collider, others not (mushrooms, flowers).
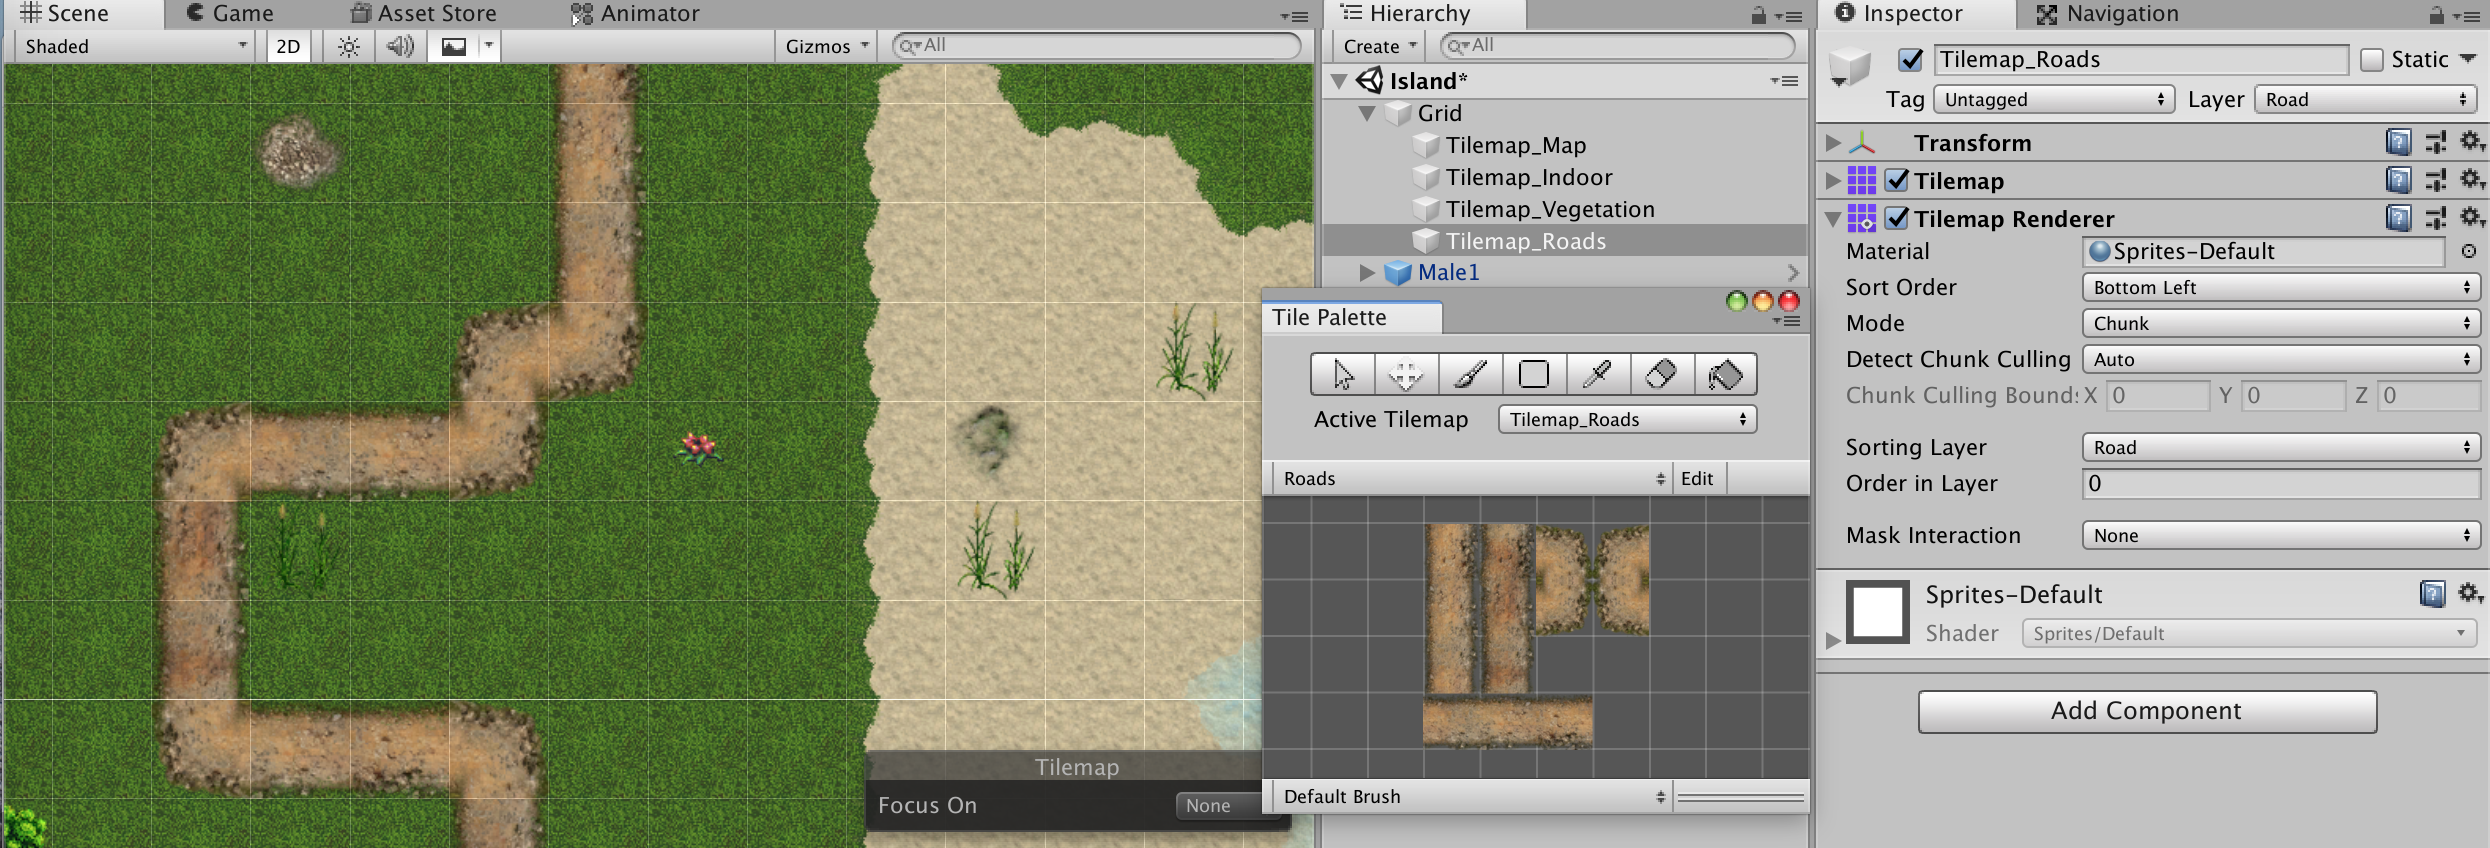
3.1.4 The roads and rocks tilemap
The roads and rocks tilemap contains the roads and rocks information.
In the Hierarchy, select the existing Grid and create a new Tilemap named Tilemap_Roads. The new tilemap is created as a child of the grid.
3.2 The interactive objects
These are objects that may vanish if the player collects them or the player might move to another location like for entering houses.
3.2.1 The player
Place the player prefab to the original player location.
Now you should be able to run around your world using the arrow keys.
3.2.2 Houses
Place a house sprite to the scene view. Set the Sorting Layer and add a Polygon Collider 2D.
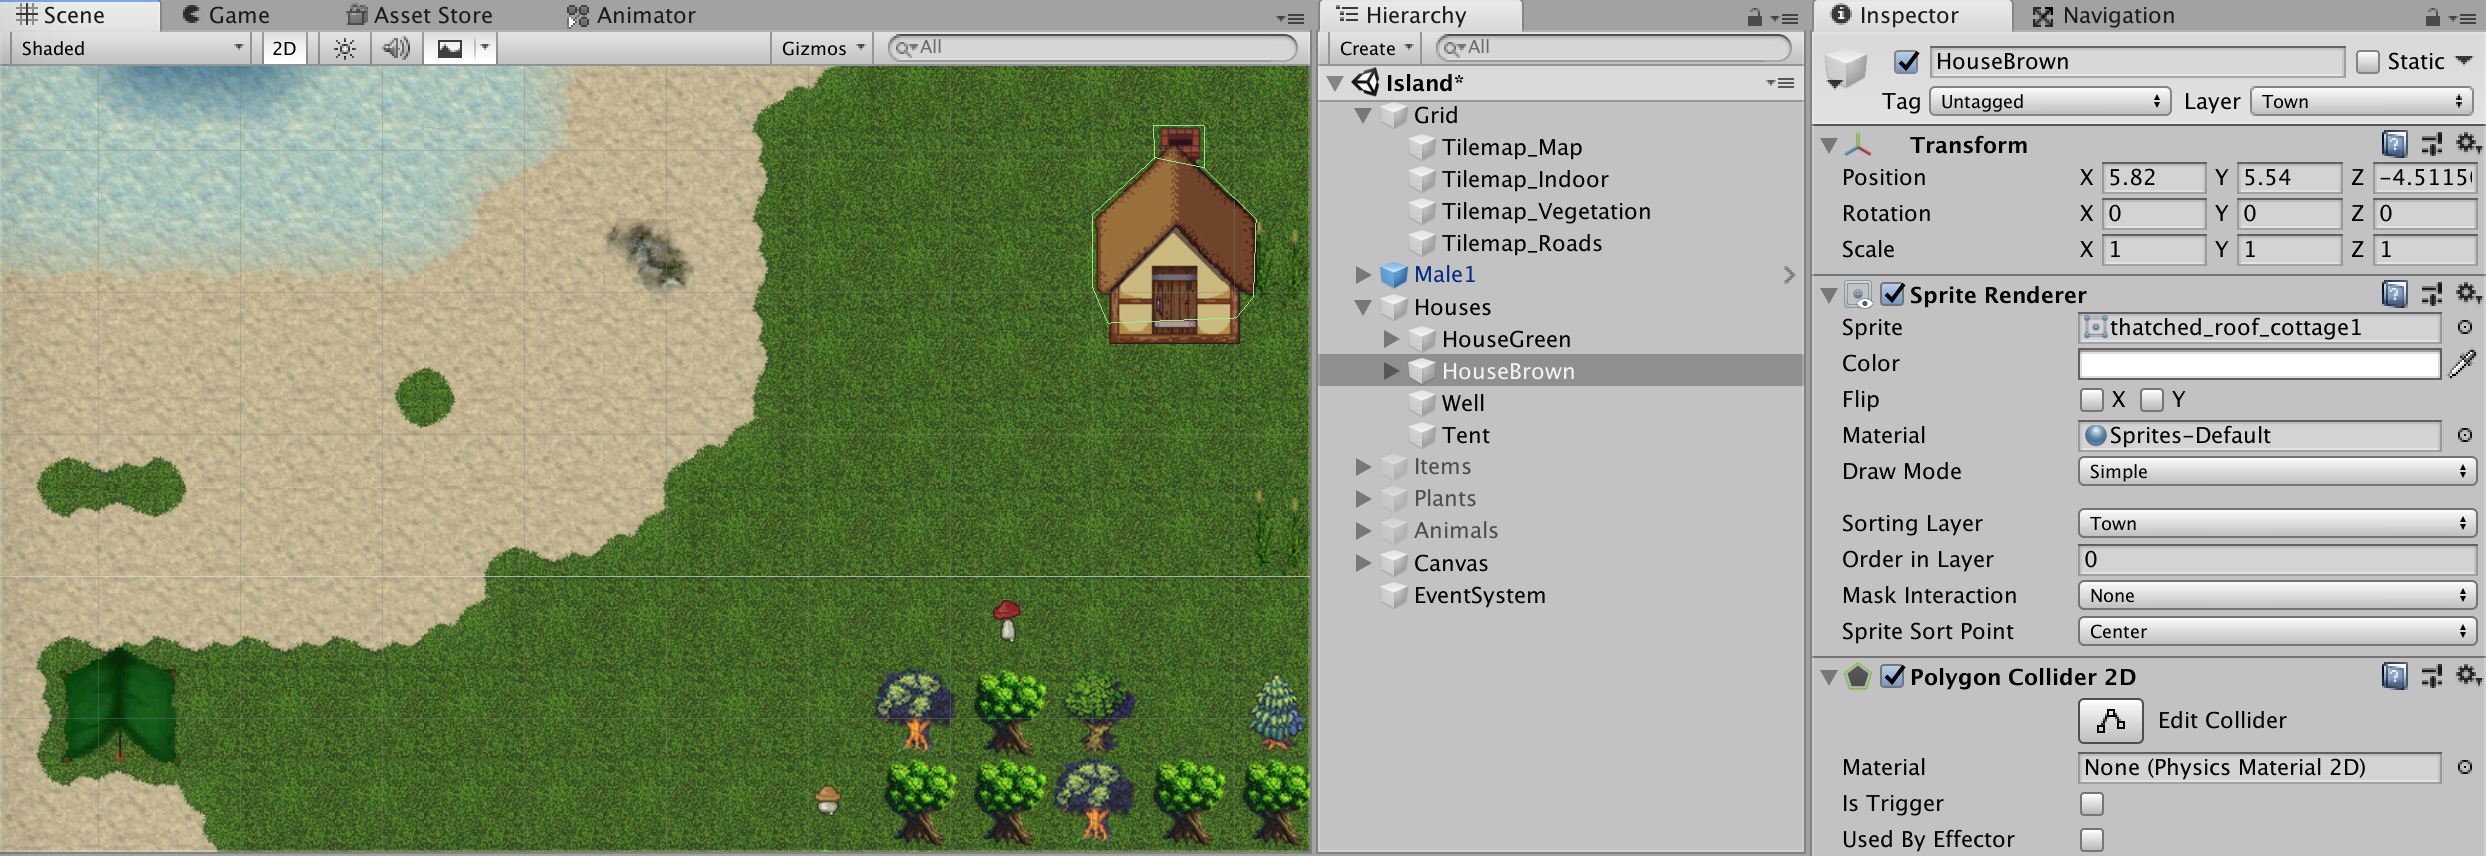
All indoor objects are stored as children of the house GameObject.
3.2.3 Items
Add some item sprites on the map. Add colliders to these objects.

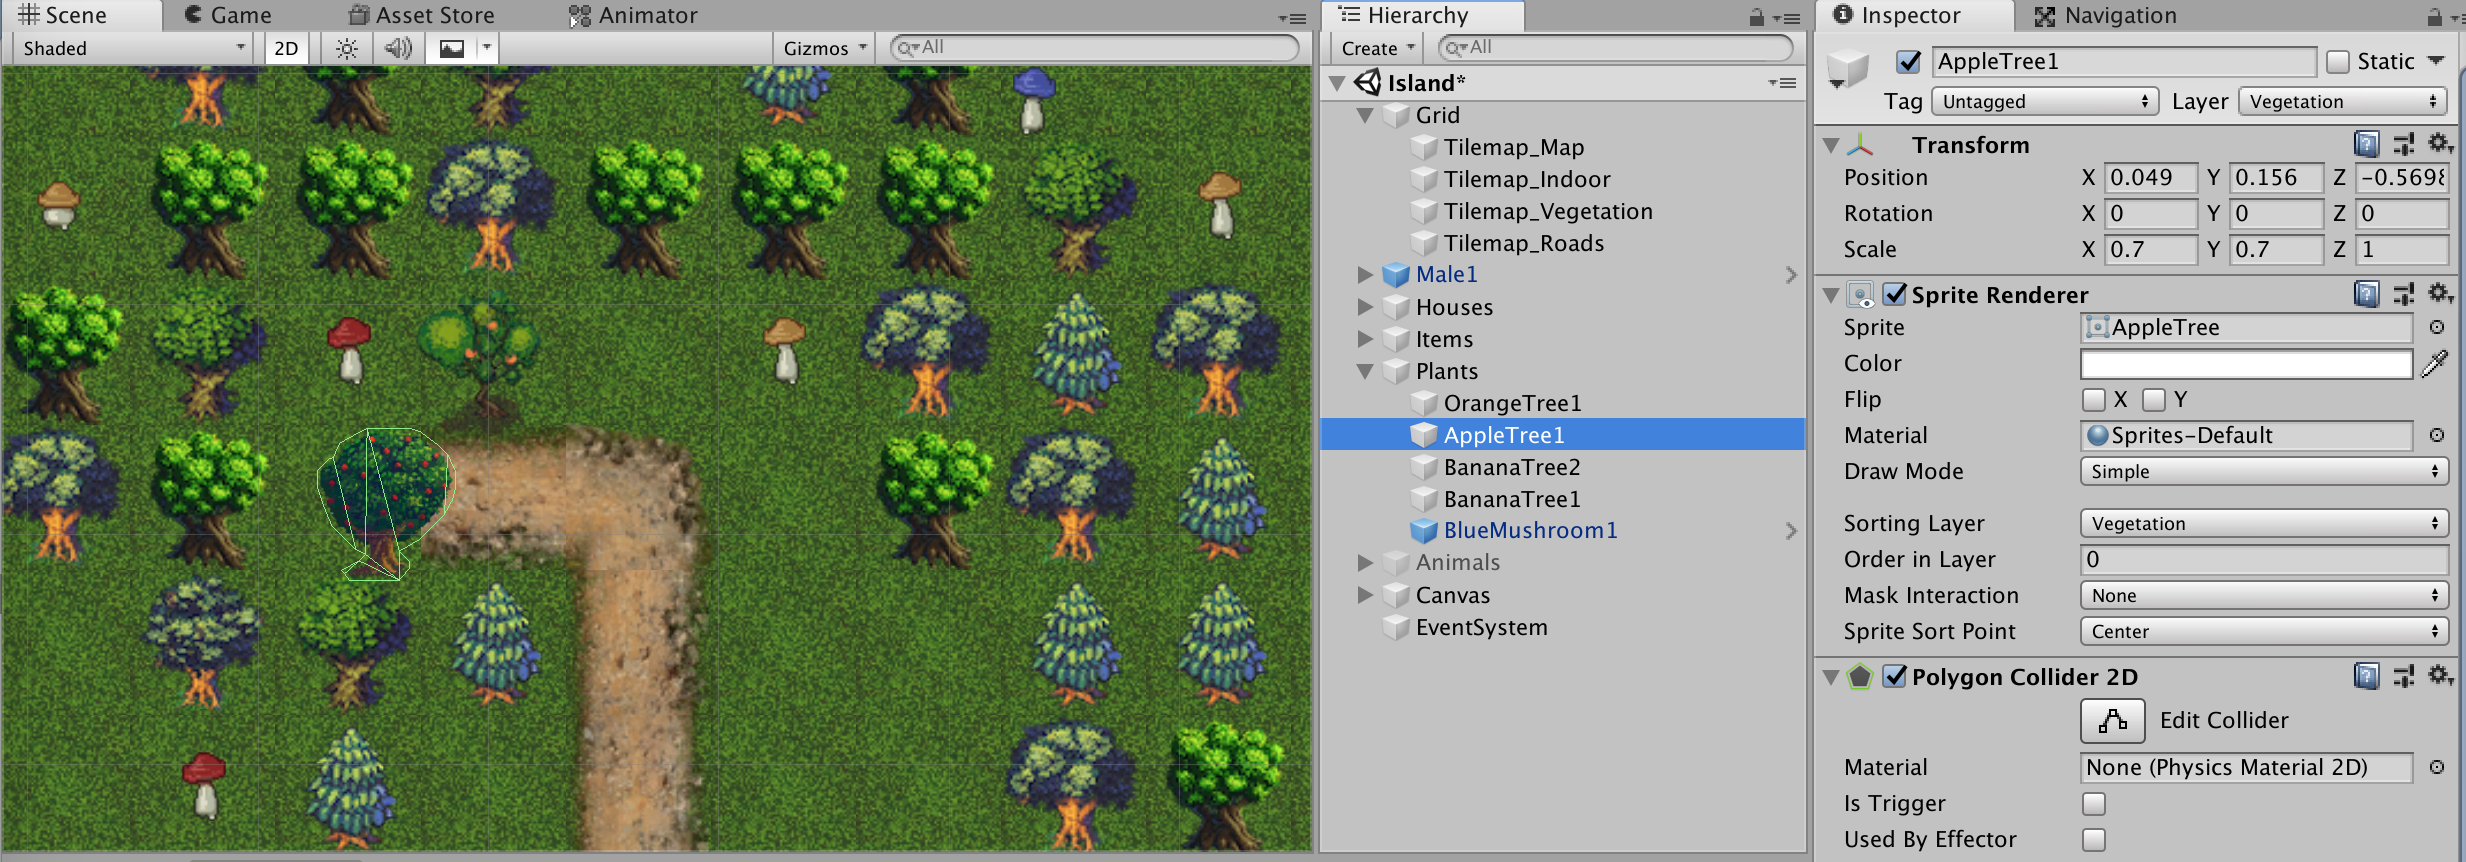
3.2.4 Plants
Add some plant sprites to the map. Add colliders to these objects.
These trees will give some fruits.
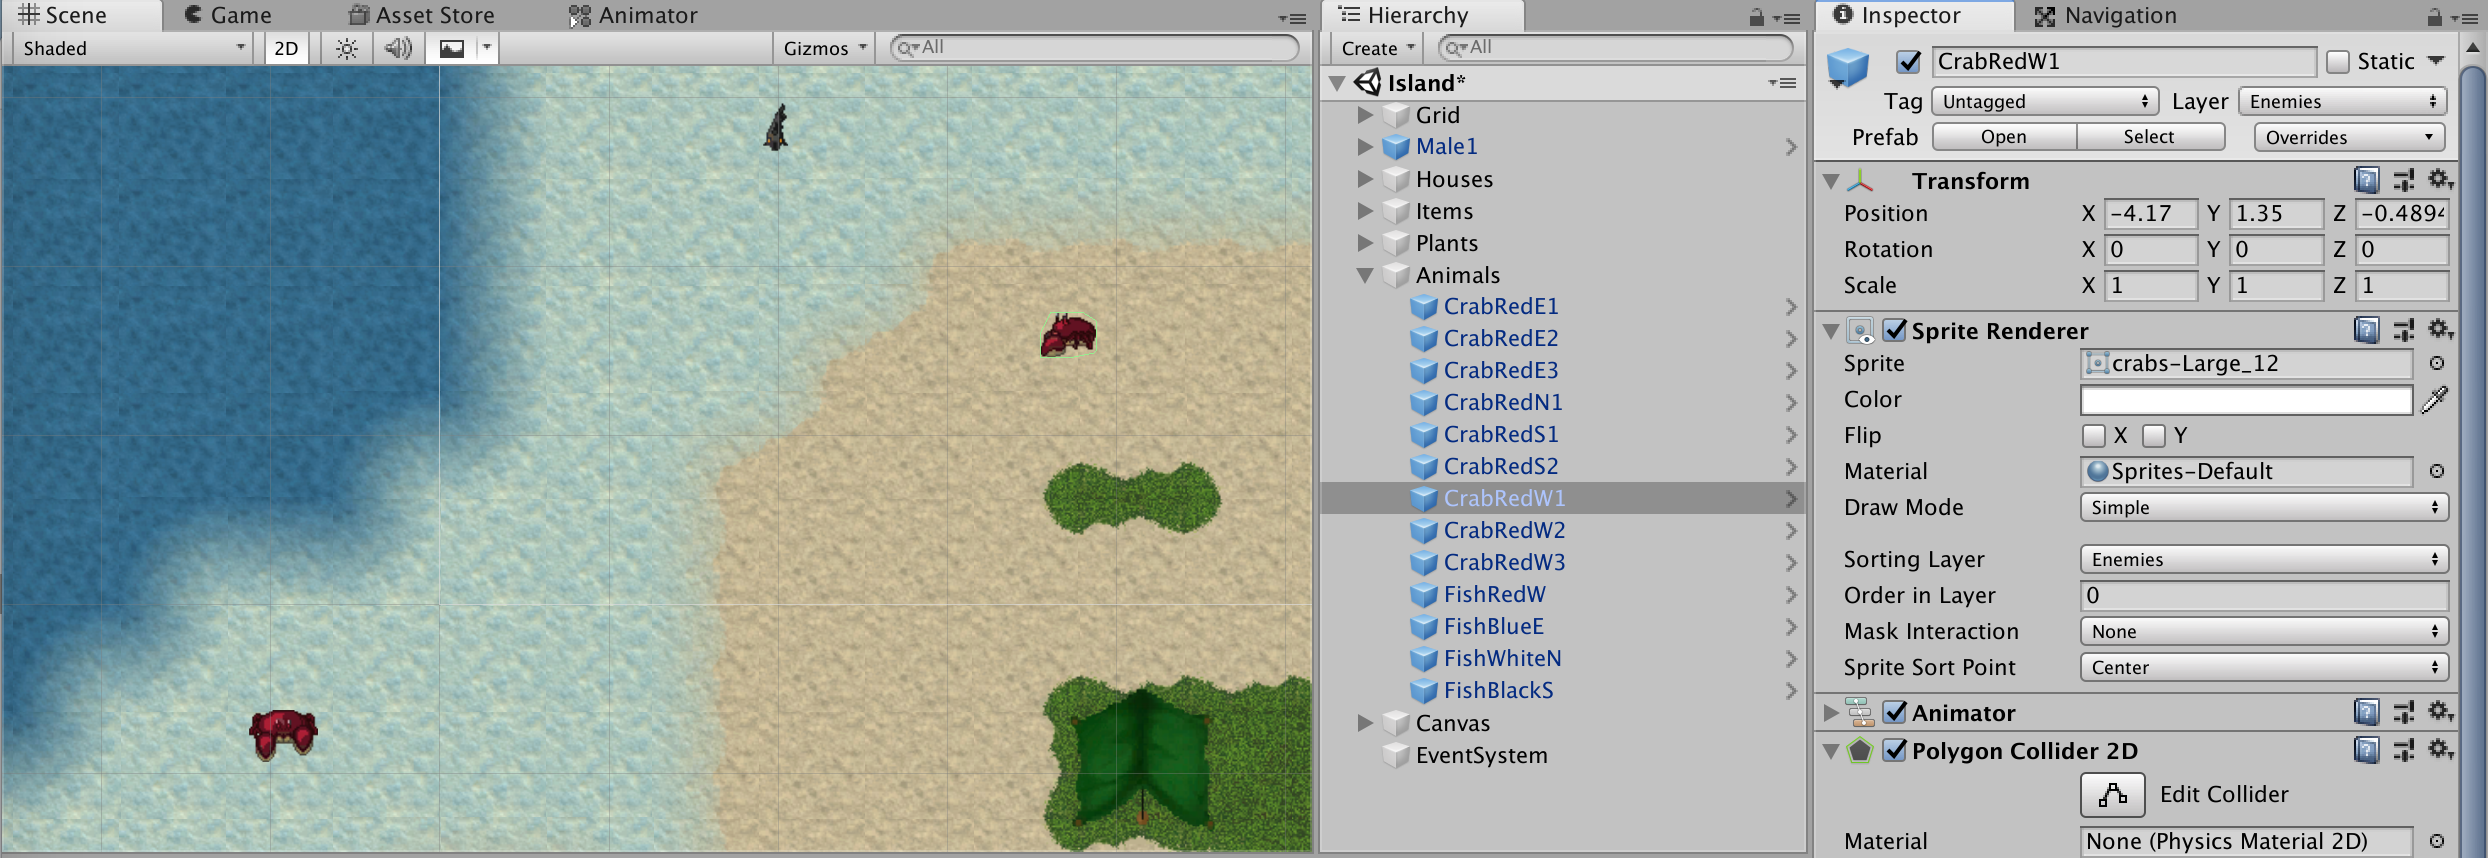
3.2.5 Animals
Add some animal prefabs to the map. Add colliders to these objects.
These animals will give some food.
3.2.6 Enemies
For now, I haven’t implemented enemies in the game.
3.3 Adding some UI
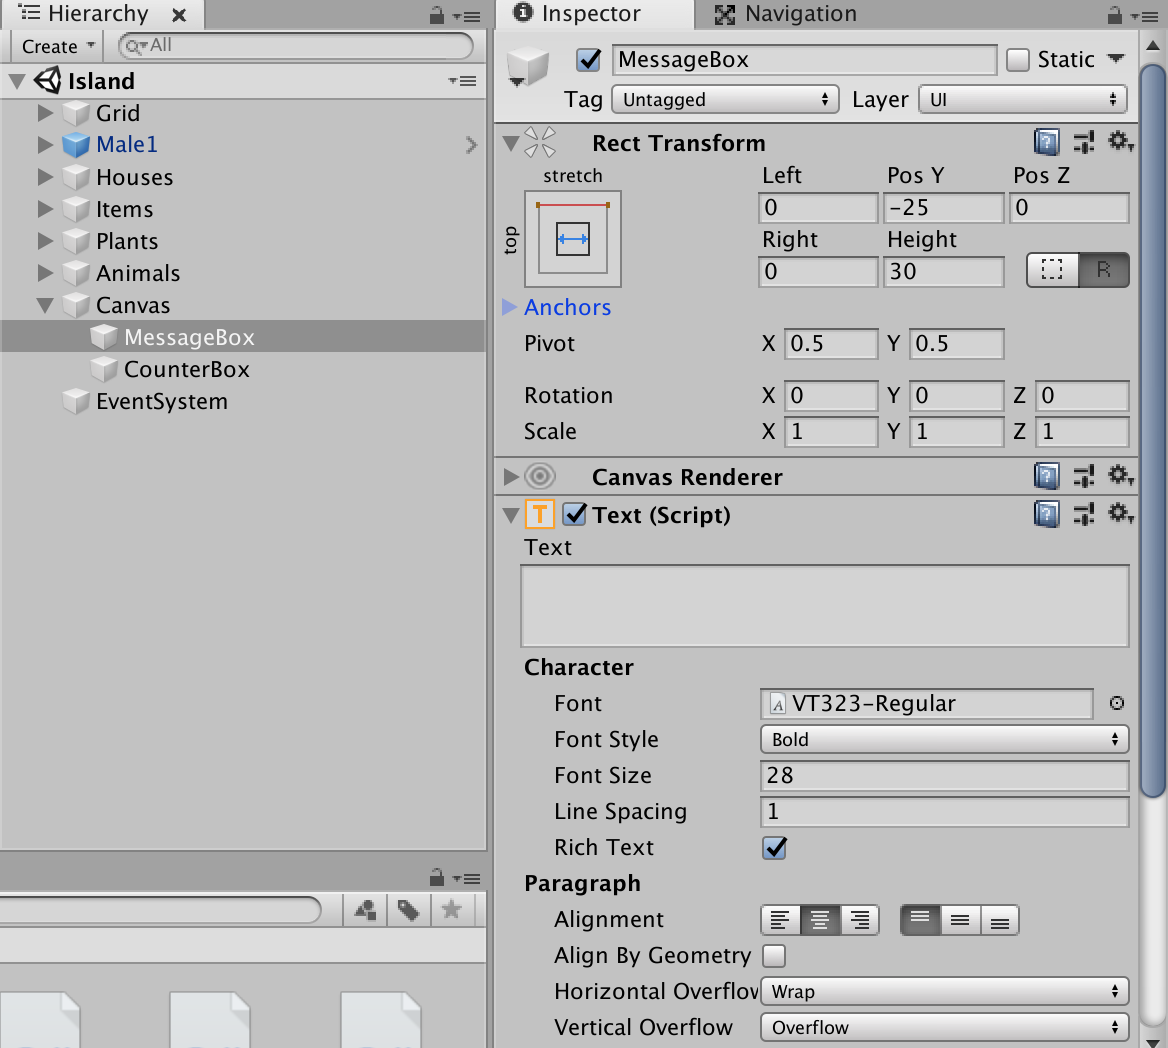
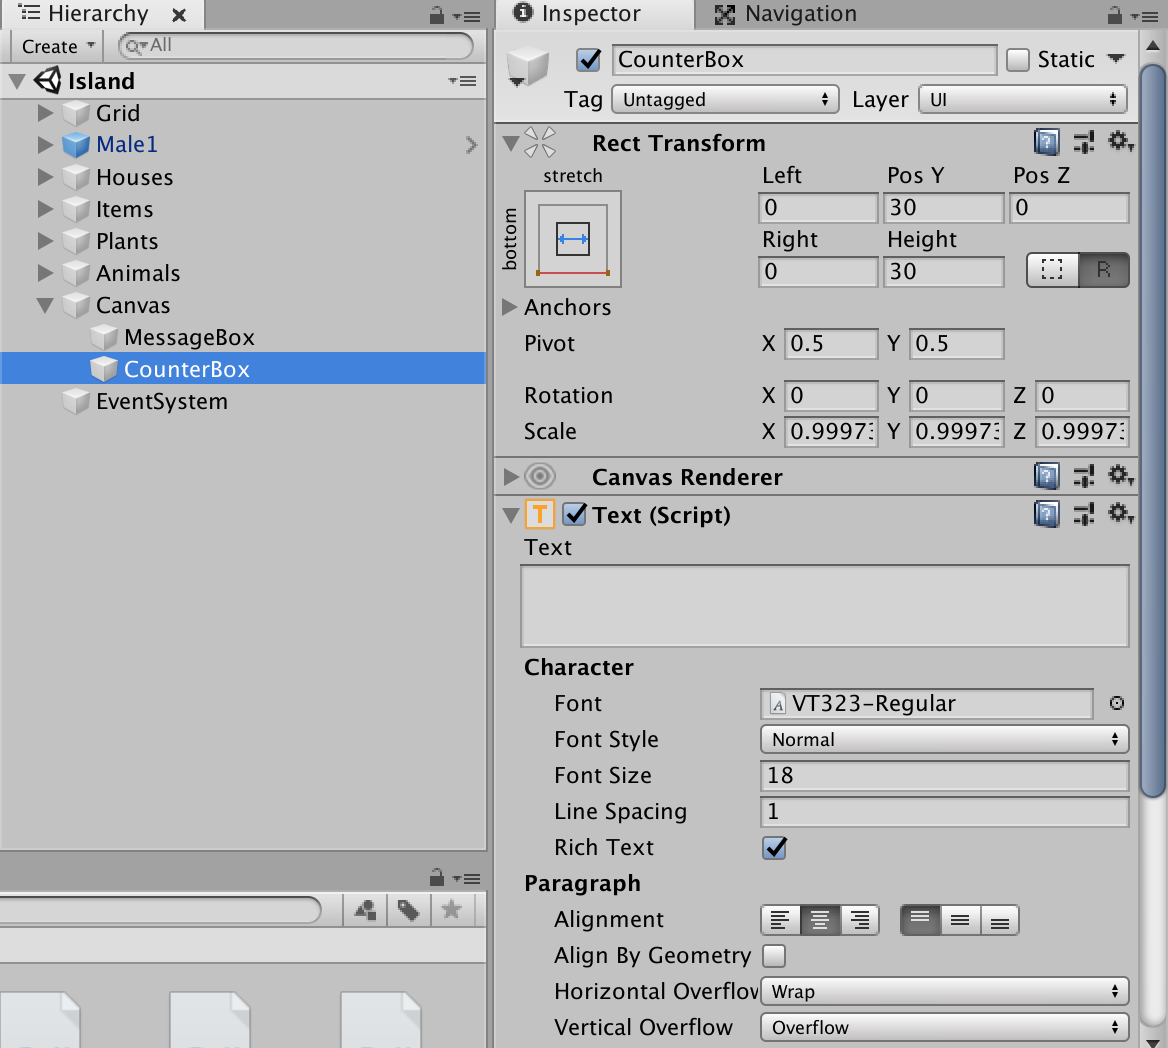
For the player, it would be interesting to have some kind of inventory and some messages to understand what happens. To achieve this, we create two UI texts in the main scene.
Create a new UI Text and name it MessageBox. Leave the Text empty (will be filled by script).
Create a new UI Text and name it CounterBox. Leave the Text empty (will be filled by script).
4. Adding a menu scene
Create a new scene containing the game intro menu.
Add the World scene and the menu scene to the Build Settings. Set the menu scene at first (index 0).
4.1 The Main Menu Panel
The main menu panel is what you see when you start the game. It must have the following buttons:
- Start – To start the game.
- Player Setup
- Quit
Some other buttons are possible like Credits or Help, which link to those panels.
4.1.1 Start button
The Start button is configured like this:
- It hides the MainMenu Panel
- It shows the PlayerSetup Panel
- It runs the attached script

The script code is the following:
using System.Collections;
using System.Collections.Generic;
using UnityEngine;
using UnityEngine.SceneManagement;
public class LoadGameScene : MonoBehaviour
{
public string SceneToLoad = "Island000";
//0=inactive, 1=active
private int p1Toggle;
private int p2Toggle;
private int p3Toggle;
public void LoadSceneByName()
{
//get the Toggle values from memory
p1Toggle = PlayerPrefs.GetInt("p1Toggle");
p2Toggle = PlayerPrefs.GetInt("p2Toggle");
p3Toggle = PlayerPrefs.GetInt("p3Toggle");
//Load game scene only if 1 player is selected
if ((p1Toggle == 1) || (p2Toggle == 1) || (p3Toggle == 1))
{
SceneManager.LoadScene(SceneToLoad);
}
//if no player selected, loads the player setup screen (linked in unity)
}
}
4.1.2 Player Setup button
The Player Setup button is configured like this:
- It hides the MainMenu Panel
- It shows the PlayerSetup Panel
4.1.3 Quit button
The Quit button is configured like this:
- It runs the attached script
The script code is the following:
using System.Collections;
using System.Collections.Generic;
using UnityEngine;
public class AppQuit : MonoBehaviour
{
public void QuitApp()
{
// using the platform dependent commands
#if UNITY_EDITOR
UnityEditor.EditorApplication.isPlaying = false;
#elif UNITY_WEBGL
//if fullscreen is true, turn it to false
if(Screen.fullScreen == true)
{
Screen.fullScreen = !Screen.fullScreen;
}
//open an URL when quitting WebGL
Application.OpenURL("http://mountainpath.ch/cmsimplexh/index.php?Unity-3D");
#else
Application.Quit();
#endif
}
}
4.2 The Player Setup Panel
This panel allows:
- to select a player
- to enter its name
- to choose its character
- to go back to the main panel
Note that you can’t select more than one player for a given game.
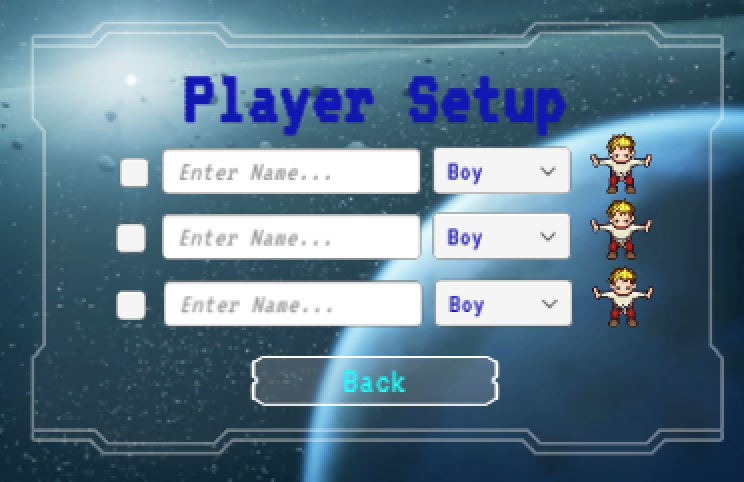
Actually, radioboxes would be better than checkboxes, but Unity3D doesn’t know radioboxes...
4.2.1 Create the toggles
So we need to emulate that behavior by creating an empty GameObject, with name ToggleGroup. Add a ToggleGroup component.
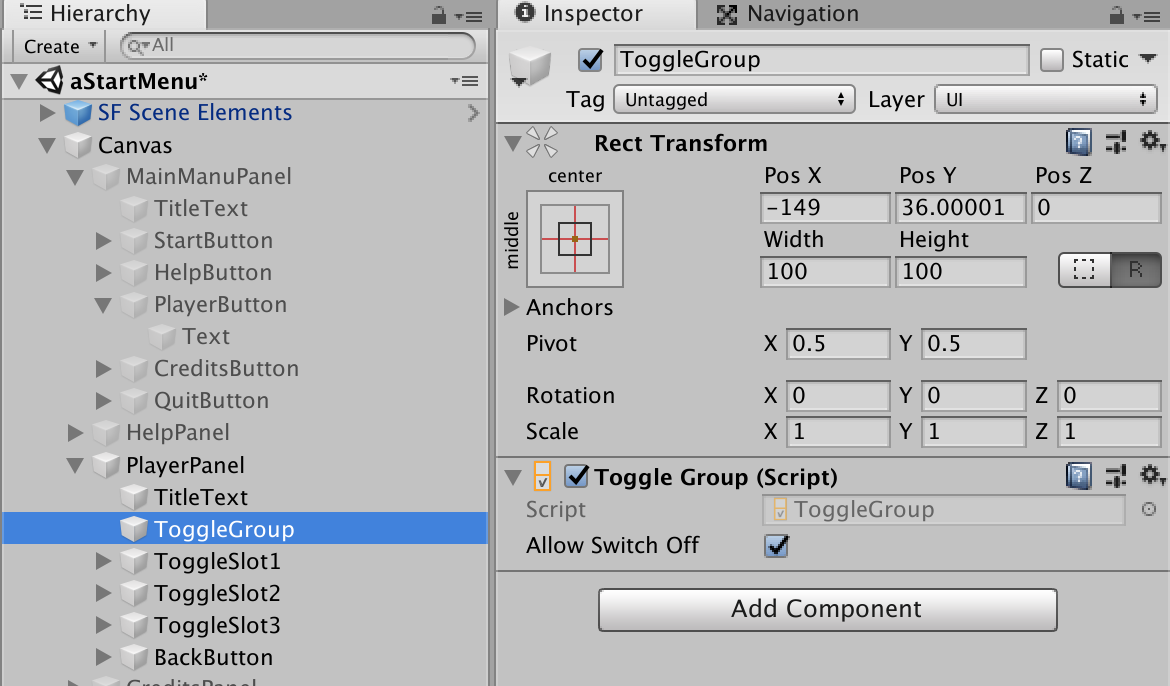
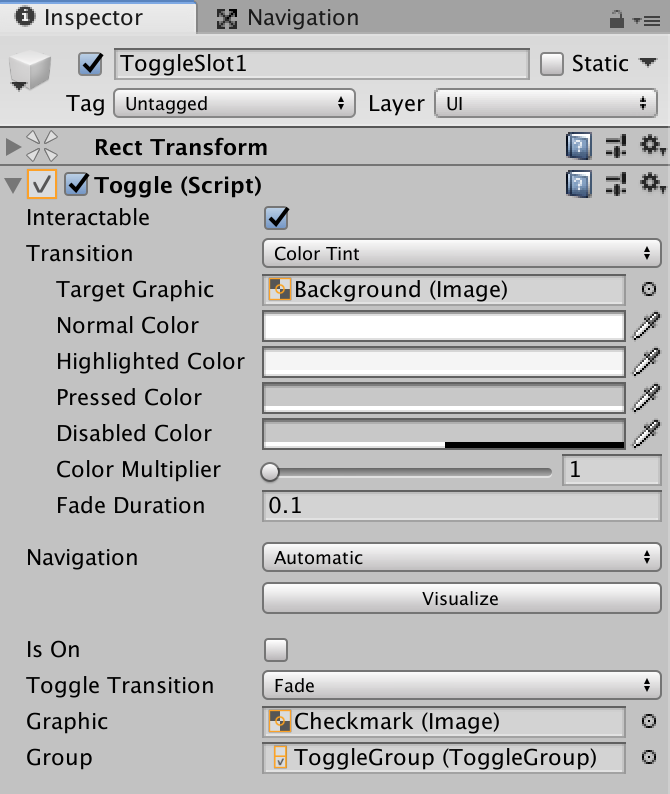
Create a new Toggle; name it ToggleSlot1.
Under Toggle > Group, add the ToggleGroup created before.
Under ToggleSlot1, add a new InputField and a new DropDown. Name these InputFieldP1 and DropDownP1.
Add an Image to the DropDownP1.
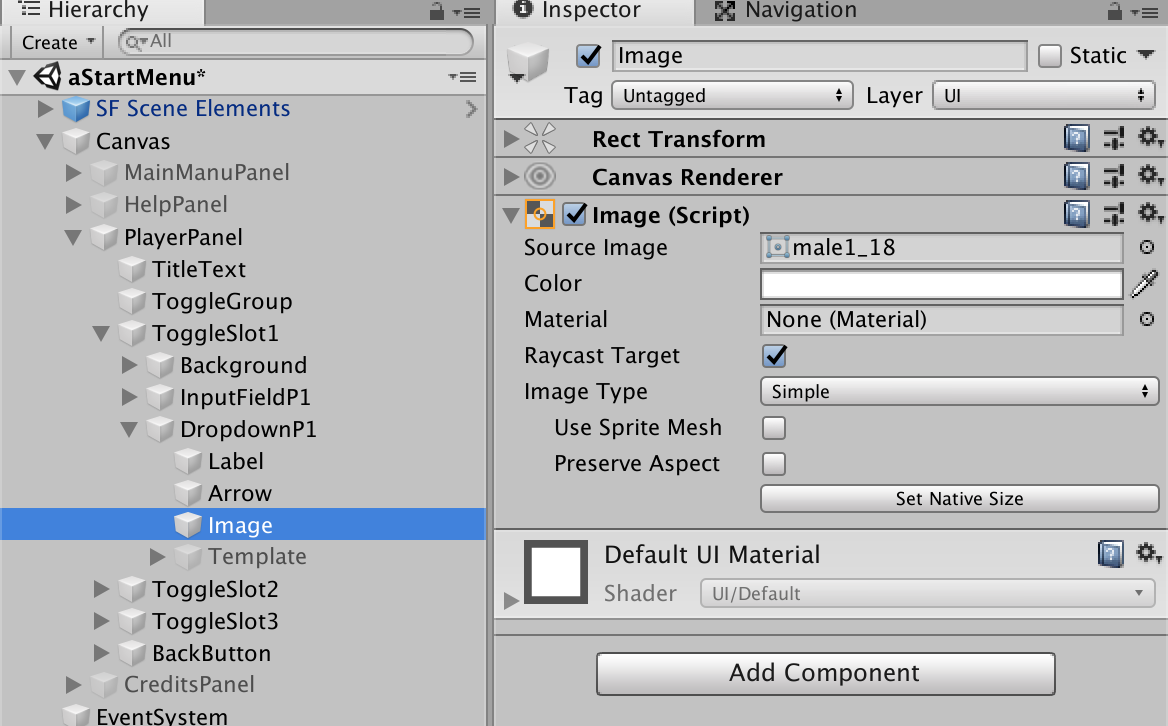
Set the options for all your characters (name and image) in the dropdown.
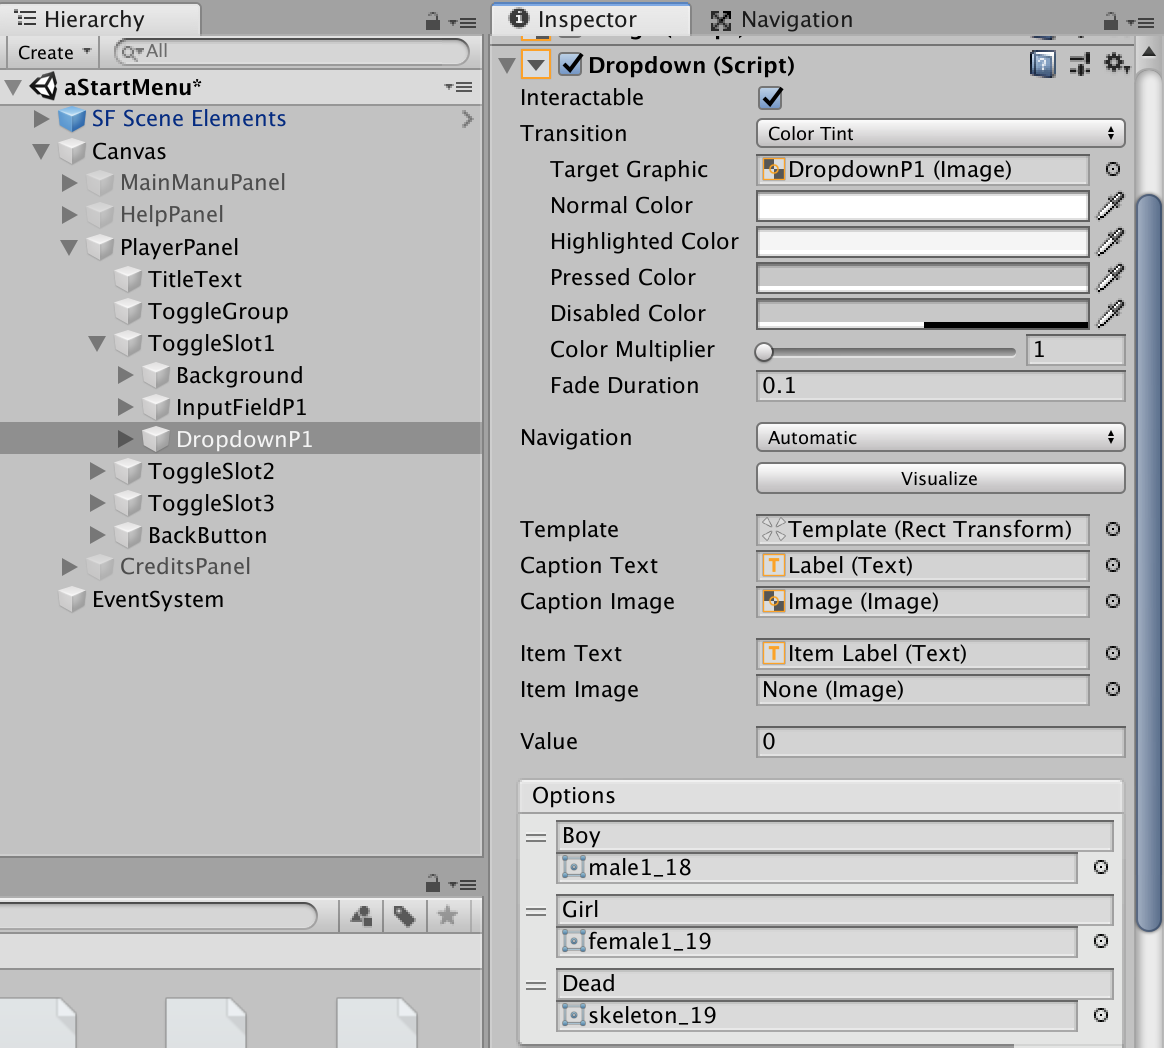
Duplicate the ToggleSlot1 twice to have 3 players and rename those.
4.2.2 The Back button
Create a new PlayerSetup script and add it to the back button.
The Back button:
- shows the main menu
- hides the player setup
- runs the function SaveStats found in the PlayerSetup script.
The SaveStats function gathers all options and save these to the disk. Its code is the following:
public void SaveStats()
{
//saves the Toggle values to memory
if (Toggle1.isOn == true)
{
p1Toggle = 1;
} else
{
p1Toggle = 0;
}
PlayerPrefs.SetInt("p1Toggle", p1Toggle);
if (Toggle2.isOn == true)
{
p2Toggle = 1;
}
else
{
p2Toggle = 0;
}
PlayerPrefs.SetInt("p2Toggle", p2Toggle);
if (Toggle3.isOn == true)
{
p3Toggle = 1;
}
else
{
p3Toggle = 0;
}
PlayerPrefs.SetInt("p3Toggle", p3Toggle);
//saves the players' names to memory
InitGameItemValues(p1Name, inputField1.text,1);
p1Name = inputField1.text;
PlayerPrefs.SetString("p1Name", p1Name);
InitGameItemValues(p2Name, inputField2.text,2);
p2Name = inputField2.text;
PlayerPrefs.SetString("p2Name", p2Name);
InitGameItemValues(p3Name, inputField3.text,3);
p3Name = inputField3.text;
PlayerPrefs.SetString("p3Name", p3Name);
//saves the Character Types to memory
p1CharType = Dropdown1.value;
PlayerPrefs.SetInt("p1CharType", p1CharType);
p2CharType = Dropdown2.value;
PlayerPrefs.SetInt("p2CharType", p2CharType);
p3CharType = Dropdown3.value;
PlayerPrefs.SetInt("p3CharType", p3CharType);
}
This function calls another function named InitGameItemValues which initializes all stored settings for a given player, if the player’s name is modified.
void InitGameItemValues(string name1, string name2, int i)
{
if (name1 != name2)
{
//Initialize the scene to load next
PlayerPrefs.SetInt("ThisSceneID" + i, 1);
//Initialize the player's origin position
PlayerPrefs.SetFloat("PosX" + i, 1.63f); //origin is 1.63
PlayerPrefs.SetFloat("PosY" + i, -4.28f); //origin is -4.28
//Initialize the item counters (for screen display)
PlayerPrefs.SetInt("nbCrab" + i, 0);
PlayerPrefs.SetInt("nbFish" + i, 0);
PlayerPrefs.SetInt("nbApple" + i, 0);
PlayerPrefs.SetInt("nbBanana" + i, 0);
PlayerPrefs.SetInt("nbOrange" + i, 0);
PlayerPrefs.SetInt("nbMushroom" + i, 0);
PlayerPrefs.SetInt("nbKeySilver" + i, 0);
PlayerPrefs.SetInt("nbKeyYellow" + i, 0);
PlayerPrefs.SetInt("nbBackpack" + i, 0);
PlayerPrefs.SetInt("nbFishingRod" + i, 0);
PlayerPrefs.SetInt("nbCoins" + i, 0);
PlayerPrefs.SetInt("nbBread" + i, 0);
PlayerPrefs.SetInt("nbOrbs" + i, 0);
//Initialize the door locks (1=locked, 0=unlocked)
PlayerPrefs.SetInt("HouseBrownDoorLock" + i, 1);
PlayerPrefs.SetInt("HouseGreenDoorLock" + i, 1);
//Initialize the collectibles - fruits
PlayerPrefs.SetInt("OrangeTree1n" + i, 1);
PlayerPrefs.SetInt("AppleTree1n" + i, 1);
PlayerPrefs.SetInt("BananaTree1n" + i, 1);
PlayerPrefs.SetInt("BananaTree2n" + i, 1);
PlayerPrefs.SetInt("BlueMushroom1n" + i, 1);
//Initialize the collectibles - animals
PlayerPrefs.SetInt("CrabRedE1n" + i, 1);
PlayerPrefs.SetInt("CrabRedE2n" + i, 1);
PlayerPrefs.SetInt("CrabRedE3n" + i, 1);
PlayerPrefs.SetInt("CrabRedN1n" + i, 1);
PlayerPrefs.SetInt("CrabRedS1n" + i, 1);
PlayerPrefs.SetInt("CrabRedS2n" + i, 1);
PlayerPrefs.SetInt("CrabRedW1n" + i, 1);
PlayerPrefs.SetInt("CrabRedW2n" + i, 1);
PlayerPrefs.SetInt("CrabRedW3n" + i, 1);
PlayerPrefs.SetInt("FishRedWn" + i, 1);
PlayerPrefs.SetInt("FishBlueEn" + i, 1);
PlayerPrefs.SetInt("FishWhiteNn" + i, 1);
PlayerPrefs.SetInt("FishBlackSn" + i, 1);
//Initialize the collectibles - items
PlayerPrefs.SetInt("Backpack1n" + i, 1);
PlayerPrefs.SetInt("fishingrod1n" + i, 1);
PlayerPrefs.SetInt("KeyGold1n" + i, 1);
PlayerPrefs.SetInt("KeySilver1n" + i, 1);
PlayerPrefs.SetInt("TentCoinsn" + i, 1);
PlayerPrefs.SetInt("WellCoinsn" + i, 1);
}
}
If we load the player setup panel, we need also to assign the existing values to the options. This is done by the GetStats function that is called in the Start function.
void GetStats()
{
//get the Toggle values from memory
//and set the checkboxes in the UI
p1Toggle = PlayerPrefs.GetInt("p1Toggle");
if (p1Toggle == 1)
{
Toggle1.isOn = true;
}
p2Toggle = PlayerPrefs.GetInt("p2Toggle");
if (p2Toggle == 1)
{
Toggle2.isOn = true;
}
p3Toggle = PlayerPrefs.GetInt("p3Toggle");
if (p3Toggle == 1)
{
Toggle3.isOn = true;
}
//get the players' names from memory
//and fill the names
p1Name = PlayerPrefs.GetString("p1Name");
if (p1Name.Length > 1)
{
inputField1.text = p1Name;
}
p2Name = PlayerPrefs.GetString("p2Name");
if (p2Name.Length > 1)
{
inputField2.text = p2Name;
}
p3Name = PlayerPrefs.GetString("p3Name");
if (p3Name.Length > 1)
{
inputField3.text = p3Name;
}
//Debug.Log("p1:" + p1Name + " - p2:" + p2Name + " - p3:" + p3Name);
//get the Character Types from memory
//and set the dropdown values
p1CharType = PlayerPrefs.GetInt("p1CharType");
if ((p1CharType==0) || (p1CharType==1) || (p1CharType==2))
{
Dropdown1.value = p1CharType;
}
p2CharType = PlayerPrefs.GetInt("p2CharType");
if ((p2CharType == 0) || (p2CharType == 1) || (p2CharType == 2))
{
Dropdown2.value = p2CharType;
}
p3CharType = PlayerPrefs.GetInt("p3CharType");
if ((p3CharType == 0) || (p3CharType == 1) || (p3CharType == 2))
{
Dropdown3.value = p3CharType;
}
}
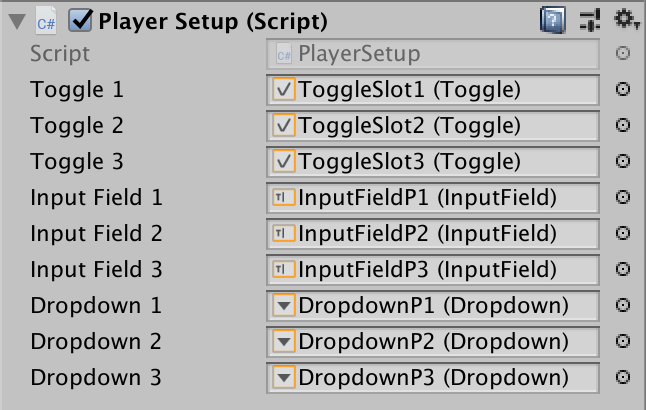
To have this work, you need to define the following variables in the PlayerSetup script:
public Toggle Toggle1;
public Toggle Toggle2;
public Toggle Toggle3;
public InputField inputField1;
public InputField inputField2;
public InputField inputField3;
public Dropdown Dropdown1;
public Dropdown Dropdown2;
public Dropdown Dropdown3;
//0=inactive, 1=active
private int p1Toggle;
private int p2Toggle;
private int p3Toggle;
private string p1Name;
private string p2Name;
private string p3Name;
//0=boy, 1=girl, 2=skeleton
private int p1CharType;
private int p2CharType;
private int p3CharType;
And assign the toggles, inputfileds and dropdowns in Unity3D.
5. Scripting the interactions
Important note:
These scripts contain some cross-references to other scripts (mainly to the GridScript). This allows us to store variables in one script and to access those from anywhere in the same scene.
If we change/unload the scene, we write all these variables to the disk. While loading the another scene, we read the variables from the disk and store them in memory. This allows also to have a kind of “Save” method.
5.1 The Grid Script
Here we handle the following:
- inventory: when the player collects/exchanges stuff, the inventory is modified.
- reading from disk: when the game starts (start or level change), we need to read the variable values from disk and add these into the memory.
- writing to disk: when the game ends (quit or level change), we need to store the variable values to the disk.
using System.Collections;
using System.Collections.Generic;
using UnityEngine.UI;
using UnityEngine;
using UnityEngine.SceneManagement;
public class GridScript : MonoBehaviour
{
//Define the CounterBox
public Text CounterBox;
private string CounterText;
//Player interaction
public string PlayerName;
private int PlayerType;
private string PlayerCharName;
public Transform male;
public Transform female;
public Transform skeleton;
//defines which player is playing
private int i;
//define global variables
//Animals
public int nbCrab;
public int nbFish;
//Fruits
public int nbApple;
public int nbBanana;
public int nbOrange;
public int nbMushroom;
//Items
public int nbKeySilver;
public int nbKeyYellow;
public int nbFishingRod;
public int nbBackpack;
public int nbCoins;
public int nbOrbs;
public int nbBread;
//Doors - 0=locked, 1=open
public int HouseBrownDoorLock;
public int HouseGreenDoorLock;
//Items - 1=active, 0=inactive
public int Backpack1n;
public int fishingrod1n;
public int KeyGold1n;
public int KeySilver1n;
public int TentCoinsn;
public int WellCoinsn;
//Plants - 1=active, 0=inactive
public int OrangeTree1n;
public int AppleTree1n;
public int BananaTree1n;
public int BananaTree2n;
public int BlueMushroom1n;
//Animals - 1=active, 0=inactive
public int CrabRedE1n;
public int CrabRedE2n;
public int CrabRedE3n;
public int CrabRedN1n;
public int CrabRedS1n;
public int CrabRedS2n;
public int CrabRedW1n;
public int CrabRedW2n;
public int CrabRedW3n;
public int FishRedWn;
public int FishBlueEn;
public int FishWhiteNn;
public int FishBlackSn;
public int ThisSceneID;
// Start is called before the first frame update
void Start()
{
//Define which player (1,2,3) is playing and set its character
if (PlayerPrefs.GetInt("p1Toggle") == 1)
{
i = 1;
PlayerName = PlayerPrefs.GetString("p1Name");
PlayerType = PlayerPrefs.GetInt("p1CharType");
MyPlayerChar(PlayerType);
}
if (PlayerPrefs.GetInt("p2Toggle") == 1)
{
i = 2;
PlayerName = PlayerPrefs.GetString("p2Name");
PlayerType = PlayerPrefs.GetInt("p2CharType");
MyPlayerChar(PlayerType);
}
if (PlayerPrefs.GetInt("p3Toggle") == 1)
{
i = 3;
PlayerName = PlayerPrefs.GetString("p3Name");
PlayerType = PlayerPrefs.GetInt("p3CharType");
MyPlayerChar(PlayerType);
}
//Get the scene buildIndex
ThisSceneID = PlayerPrefs.GetInt("ThisSceneID" + i);
//get the inventory values
nbCrab = PlayerPrefs.GetInt("nbCrab" + i);
nbFish = PlayerPrefs.GetInt("nbFish" + i);
nbApple = PlayerPrefs.GetInt("nbApple" + i);
nbBanana = PlayerPrefs.GetInt("nbBanana" + i);
nbOrange = PlayerPrefs.GetInt("nbOrange" + i);
nbMushroom = PlayerPrefs.GetInt("nbMushroom" + i);
nbKeySilver = PlayerPrefs.GetInt("nbKeySilver" + i);
nbKeyYellow = PlayerPrefs.GetInt("nbKeyYellow" + i);
nbBackpack = PlayerPrefs.GetInt("nbBackpack" + i);
nbFishingRod = PlayerPrefs.GetInt("nbFishingRod" + i);
nbCoins = PlayerPrefs.GetInt("nbCoins" + i);
nbOrbs = PlayerPrefs.GetInt("nbOrbs" + i);
nbBread = PlayerPrefs.GetInt("nbBread" + i);
//get the house locks
HouseBrownDoorLock = PlayerPrefs.GetInt("HouseBrownDoorLock" + i);
HouseGreenDoorLock = PlayerPrefs.GetInt("HouseGreenDoorLock" + i);
//get the collected items values
Backpack1n = PlayerPrefs.GetInt("Backpack1n" + i);
fishingrod1n = PlayerPrefs.GetInt("fishingrod1n" + i);
KeyGold1n = PlayerPrefs.GetInt("KeyGold1n" + i);
KeySilver1n = PlayerPrefs.GetInt("KeySilver1n" + i);
TentCoinsn = PlayerPrefs.GetInt("TentCoinsn" + i);
WellCoinsn = PlayerPrefs.GetInt("WellCoinsn" + i);
//get the collected plants values
AppleTree1n = PlayerPrefs.GetInt("AppleTree1n" + i);
BananaTree1n = PlayerPrefs.GetInt("BananaTree1n" + i);
BananaTree2n = PlayerPrefs.GetInt("BananaTree2n" + i);
OrangeTree1n = PlayerPrefs.GetInt("OrangeTree1n" + i);
BlueMushroom1n = PlayerPrefs.GetInt("BlueMushroom1n" + i);
//store the collected animals values
CrabRedE1n = PlayerPrefs.GetInt("CrabRedE1n" + i);
CrabRedE2n = PlayerPrefs.GetInt("CrabRedE2n" + i);
CrabRedE3n = PlayerPrefs.GetInt("CrabRedE3n" + i);
CrabRedN1n = PlayerPrefs.GetInt("CrabRedN1n" + i);
CrabRedS1n = PlayerPrefs.GetInt("CrabRedS1n" + i);
CrabRedS2n = PlayerPrefs.GetInt("CrabRedS2n" + i);
CrabRedW1n = PlayerPrefs.GetInt("CrabRedW1n" + i);
CrabRedW2n = PlayerPrefs.GetInt("CrabRedW2n" + i);
CrabRedW3n = PlayerPrefs.GetInt("CrabRedW3n" + i);
FishRedWn = PlayerPrefs.GetInt("FishRedWn" + i);
FishBlueEn = PlayerPrefs.GetInt("FishBlueEn" + i);
FishWhiteNn = PlayerPrefs.GetInt("FishWhiteNn" + i);
FishBlackSn = PlayerPrefs.GetInt("FishBlackSn" + i);
//disable item object if already found
if (Backpack1n == 0)
{
GameObject.Find("Backpack1").SetActive(false);
}
//disable item object if already found
if (fishingrod1n == 0)
{
GameObject.Find("fishingrod1").SetActive(false);
}
//disable item object if already found
if (KeyGold1n == 0)
{
GameObject.Find("KeyGold1").SetActive(false);
}
//disable item object if already found
if (KeySilver1n == 0)
{
GameObject.Find("KeySilver1").SetActive(false);
}
//disable plant object if already found
if (BlueMushroom1n == 0)
{
GameObject.Find("BlueMushroom1").SetActive(false);
}
//disable animal (crab) object if already picked up
if (CrabRedE1n == 0)
{
GameObject.Find("CrabRedE1").SetActive(false);
}
//disable animal (crab) object if already picked up
if (CrabRedE2n == 0)
{
GameObject.Find("CrabRedE2").SetActive(false);
}
//disable animal (crab) object if already picked up
if (CrabRedE3n == 0)
{
GameObject.Find("CrabRedE3").SetActive(false);
}
//disable animal (crab) object if already picked up
if (CrabRedN1n == 0)
{
GameObject.Find("CrabRedN1").SetActive(false);
}
//disable animal (crab) object if already picked up
if (CrabRedS1n == 0)
{
GameObject.Find("CrabRedS1").SetActive(false);
}
//disable animal (crab) object if already picked up
if (CrabRedS2n == 0)
{
GameObject.Find("CrabRedS2").SetActive(false);
}
//disable animal (crab) object if already picked up
if (CrabRedW1n == 0)
{
GameObject.Find("CrabRedW1").SetActive(false);
}
//disable animal (crab) object if already picked up
if (CrabRedW2n == 0)
{
GameObject.Find("CrabRedW2").SetActive(false);
}
//disable animal (crab) object if already picked up
if (CrabRedW3n == 0)
{
GameObject.Find("CrabRedW3").SetActive(false);
}
//disable animal (fish) object if already picked up
//We do not disable the fishes. Each time the player re-enters the scene, he can collect those again.
SetCounterText();
} //END START
// Update is called once per frame
void Update()
{
//update the inventory during gameplay
SetCounterText();
//quit to start menu if Q is pressed
if (Input.GetKeyDown(KeyCode.Q))
{
QuitGame(0,0);
}
} //END UPDATE
//build the inventory and fill the counter textbox
void SetCounterText()
{
CounterText = "";
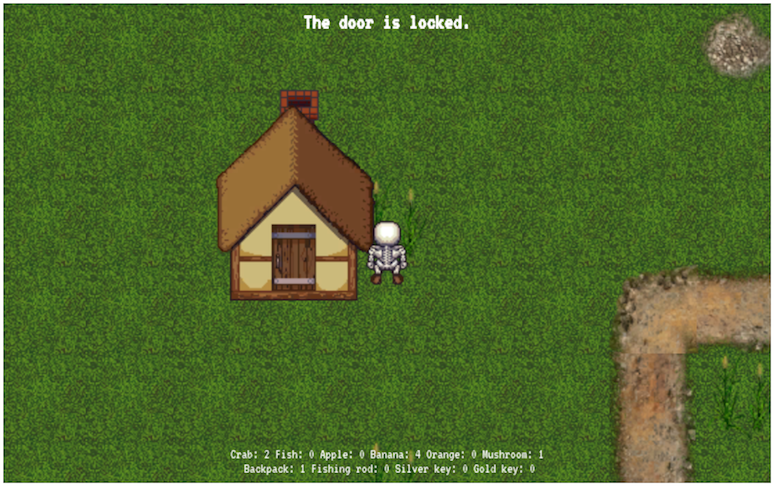
CounterText = CounterText + "Crab: " + nbCrab;
CounterText = CounterText + " Fish: " + nbFish;
CounterText = CounterText + " Apple: " + nbApple;
CounterText = CounterText + " Banana: " + nbBanana;
CounterText = CounterText + " Orange: " + nbOrange;
CounterText = CounterText + " Mushroom: " + nbMushroom;
CounterText = CounterText + " Bread: " + nbBread;
CounterText = CounterText + "\r\n Backpack: " + nbBackpack;
CounterText = CounterText + " Fishing rod: " + nbFishingRod;
CounterText = CounterText + " Silver key: " + nbKeySilver;
CounterText = CounterText + " Gold key: " + nbKeyYellow;
CounterText = CounterText + " Coins: " + nbCoins;
CounterText = CounterText + " Orbs: " + nbOrbs;
CounterBox.text = CounterText;
} //END SetCounterText
//on quit or scene change, save all variables for a later gameplay
//flag=0: go to start menu
//flag=1: go from scene 1 to 2
public void QuitGame(int SceneNb, int flag)
{
float posX, posY;
//store the scene BuildIndex
Scene ThisScene = SceneManager.GetActiveScene();
ThisSceneID = ThisScene.buildIndex;
PlayerPrefs.SetInt("ThisSceneID" + i, ThisSceneID);
//store the inventory values
PlayerPrefs.SetInt("nbCrab" + i, nbCrab);
PlayerPrefs.SetInt("nbFish" + i, nbFish);
PlayerPrefs.SetInt("nbApple" + i, nbApple);
PlayerPrefs.SetInt("nbBanana" + i, nbBanana);
PlayerPrefs.SetInt("nbOrange" + i, nbOrange);
PlayerPrefs.SetInt("nbMushroom" + i, nbMushroom);
PlayerPrefs.SetInt("nbKeySilver" + i, nbKeySilver);
PlayerPrefs.SetInt("nbKeyYellow" + i, nbKeyYellow);
PlayerPrefs.SetInt("nbBackpack" + i, nbBackpack);
PlayerPrefs.SetInt("nbFishingRod" + i, nbFishingRod);
PlayerPrefs.SetInt("nbCoins" + i, nbCoins);
PlayerPrefs.SetInt("nbBread" + i, nbBread);
PlayerPrefs.SetInt("nbOrbs" + i, nbOrbs);
//store the house locks
PlayerPrefs.SetInt("HouseBrownDoorLock" + i, HouseBrownDoorLock);
PlayerPrefs.SetInt("HouseGreenDoorLock" + i, HouseGreenDoorLock);
//store the collected items values
PlayerPrefs.SetInt("Backpack1n" + i, Backpack1n);
PlayerPrefs.SetInt("fishingrod1n" + i, fishingrod1n);
PlayerPrefs.SetInt("KeyGold1n" + i, KeyGold1n);
PlayerPrefs.SetInt("KeySilver1n" + i, KeySilver1n);
PlayerPrefs.SetInt("TentCoinsn" + i, TentCoinsn);
PlayerPrefs.SetInt("WellCoinsn" + i, WellCoinsn);
//store the collected plants values
PlayerPrefs.SetInt("AppleTree1n" + i, AppleTree1n);
PlayerPrefs.SetInt("BananaTree1n" + i, BananaTree1n);
PlayerPrefs.SetInt("BananaTree2n" + i, BananaTree2n);
PlayerPrefs.SetInt("OrangeTree1n" + i, OrangeTree1n);
PlayerPrefs.SetInt("BlueMushroom1n" + i, BlueMushroom1n);
//store the collected animals values
PlayerPrefs.SetInt("CrabRedE1n" + i, CrabRedE1n);
PlayerPrefs.SetInt("CrabRedE2n" + i, CrabRedE2n);
PlayerPrefs.SetInt("CrabRedE3n" + i, CrabRedE3n);
PlayerPrefs.SetInt("CrabRedN1n" + i, CrabRedN1n);
PlayerPrefs.SetInt("CrabRedS1n" + i, CrabRedS1n);
PlayerPrefs.SetInt("CrabRedS2n" + i, CrabRedS2n);
PlayerPrefs.SetInt("CrabRedW1n" + i, CrabRedW1n);
PlayerPrefs.SetInt("CrabRedW2n" + i, CrabRedW2n);
PlayerPrefs.SetInt("CrabRedW3n" + i, CrabRedW3n);
PlayerPrefs.SetInt("FishRedWn" + i, FishRedWn);
PlayerPrefs.SetInt("FishBlueEn" + i, FishBlueEn);
PlayerPrefs.SetInt("FishWhiteNn" + i, FishWhiteNn);
PlayerPrefs.SetInt("FishBlackSn" + i, FishBlackSn);
//store the player position
if (flag == 1)
{
//fires only when going from scene 1 to 2
posX = -18.0f; //origin X scene2
posY = -4.0f; //origin Y scene2
} else
{
//fires if player hits Q
GameObject playerObject = GameObject.FindGameObjectsWithTag("Player")[0];
posX = playerObject.transform.position.x;
posY = playerObject.transform.position.y;
}
PlayerPrefs.SetFloat("PosX" + i, posX); //origin X scene1 = 1.63
PlayerPrefs.SetFloat("PosY" + i, posY); //origin Y scene1 = -4.28
//load the start menu scene
SceneManager.LoadScene(SceneNb);
} //END QuitGame
//Create the correct character
void MyPlayerChar(int CharType)
{
//PlayerCharName = GameObject.FindGameObjectsWithTag("Player")[0].name;
float posX = PlayerPrefs.GetFloat("PosX" + i);
float posY = PlayerPrefs.GetFloat("PosY" + i);
if (CharType == 0)
{
//Create the new male char
Instantiate(male, new Vector3(posX, posY, 0f), male.rotation);
//Remove the old character
//Destroy(GameObject.Find(PlayerCharName));
}
else if (CharType == 1)
{
//Create the new female char
Instantiate(female, new Vector3(posX, posY, 0f), female.rotation);
//Remove the old character
//Destroy(GameObject.Find(PlayerCharName));
}
else if (CharType == 2)
{
//Create the new skeleton
Instantiate(skeleton, new Vector3(posX, posY, 0f), skeleton.rotation);
//Remove the old character
//Destroy(GameObject.Find(PlayerCharName));
}
} //END MyPlayerChar
}
In Unity, assign the 3 player’s prefabs and the Counter textbox.
5.2 The sign script
A sign is a static object that gives the player some information when he bumps into it.
Create a new SignScript and add it to the sign. The code is quite simple:
using System.Collections;
using System.Collections.Generic;
using UnityEngine.UI;
using UnityEngine;
public class SignScript : MonoBehaviour
{
public string TextToWriteLine1;
public string TextToWriteLine2;
public Text MessageBox;
void OnCollisionEnter2D(Collision2D collision)
{
//find out if player collides with sign object
if (collision.gameObject.tag == "Player")
{
SetMessageText();
}
}
//send the message to the textbox on screen
void SetMessageText()
{
if (gameObject.name == "SignRed")
{
//If we have the red sign, we add the player name to the end.
MessageBox.text = TextToWriteLine1 + "\n\r" + TextToWriteLine2 + ", " + GameObject.Find("Grid").GetComponent<GridScript>().PlayerName + "!";
}
else
{
//If it's another sign, take both lines.
MessageBox.text = TextToWriteLine1 + "\n\r" + TextToWriteLine2;
}
//wait some time before removing the message
StartCoroutine(WaitSomeSec(3));
}
IEnumerator WaitSomeSec(int waitTime)
{
// suspend execution for waitTime seconds
yield return new WaitForSecondsRealtime(waitTime);
MessageBox.text = "";
}
}
Back in Unity3D, link the MessageBox created in the previous chapter and add some text to display.

5.3 The Item script
using System.Collections;
using System.Collections.Generic;
using UnityEngine.UI;
using UnityEngine;
public class ItemScript : MonoBehaviour
{
//ItemType: 1=backpack, 2=keyGold, 3=keySilver, 4=rod
public int ItemType;
public Text MessageBox;
private string ItemName;
void OnCollisionEnter2D(Collision2D collision)
{
//find out if player collides with sign object
if (collision.gameObject.tag == "Player")
{
if (ItemType == 1 && GameObject.Find("Grid").GetComponent<GridScript>().Backpack1n == 1)
{
ItemName = "backpack";
//The used variable must be set to public in the GridScript.
GameObject.Find("Grid").GetComponent<GridScript>().nbBackpack = GameObject.Find("Grid").GetComponent<GridScript>().nbBackpack + 1;
GameObject.Find("Grid").GetComponent<GridScript>().Backpack1n = 0;
}
else if (ItemType == 2 && GameObject.Find("Grid").GetComponent<GridScript>().KeyGold1n == 1)
{
ItemName = "gold key";
//The used variable must be set to public in the GridScript.
GameObject.Find("Grid").GetComponent<GridScript>().nbKeyYellow = GameObject.Find("Grid").GetComponent<GridScript>().nbKeyYellow + 1;
GameObject.Find("Grid").GetComponent<GridScript>().KeyGold1n = 0;
}
else if (ItemType == 3 && GameObject.Find("Grid").GetComponent<GridScript>().KeySilver1n == 1)
{
ItemName = "silver key";
//The used variable must be set to public in the GridScript.
GameObject.Find("Grid").GetComponent<GridScript>().nbKeySilver = GameObject.Find("Grid").GetComponent<GridScript>().nbKeySilver + 1;
GameObject.Find("Grid").GetComponent<GridScript>().KeySilver1n = 0;
}
else if (ItemType == 4 && GameObject.Find("Grid").GetComponent<GridScript>().fishingrod1n == 1)
{
ItemName = "fishing rod";
//The used variable must be set to public in the GridScript.
GameObject.Find("Grid").GetComponent<GridScript>().nbFishingRod = GameObject.Find("Grid").GetComponent<GridScript>().nbFishingRod + 1;
GameObject.Find("Grid").GetComponent<GridScript>().fishingrod1n = 0;
}
SetMessageText();
// hide the object
gameObject.SetActive(false);
}
}
void SetMessageText()
{
MessageBox.text = "You found a " + ItemName + ".";
StartCoroutine(WaitSomeSec(3));
}
IEnumerator WaitSomeSec(int waitTime)
{
// suspend execution for waitTime seconds
yield return new WaitForSecondsRealtime(waitTime);
MessageBox.text = "";
}
}
5.4 The house script
The house script uses the same behavior as the previous. The main difference is that the player’s position is changed, as the player enters the house. For this we need an empty GameObject inside the house and we simply transform the player’s position to the empty GameObject position using:
//teleport player into the house
playerObject.transform.position = DoorInside.transform.position;
To leave the house, it is similar.
5.5 The teleport script
To move from one scene to another (e.g. to switch the islands), we use a teleport pad on which the player can walk. The teleport pad activates itself, if the player has the needed object in his inventory.
So that the player can walk on the teleport pad, the Is Trigger setting must be checked.
In the script, we use OnTriggerEnter2D to activate the pad and in the update function we call:
GameObject.Find("Grid").GetComponent<GridScript>().QuitGame(GameObject.Find("Grid").GetComponent<GridScript>().ThisSceneID + 1, 1);
to load the next level.
6. Enhancements
6.1 Music & sound effects
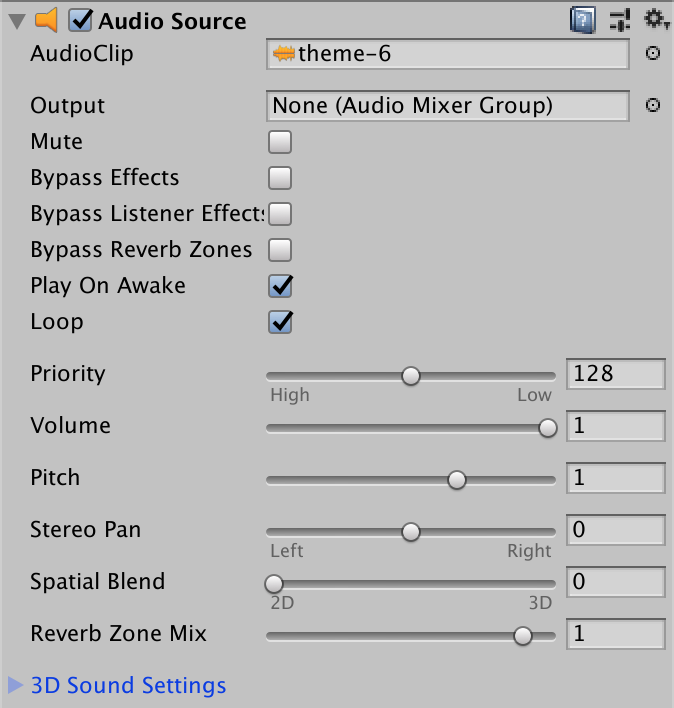
6.1.1 Background music
The background music is added to the Grid object.
6.1.2 Sound effects
[TBW]
6.1.3 Mute key
To be able to turn the music on and off, add this code to the Grid’s Update function:
//Toggles the music
if (Input.GetKeyUp(KeyCode.M))
{
gameObject.GetComponent<AudioSource>().mute = !gameObject.GetComponent<AudioSource>().mute;
}
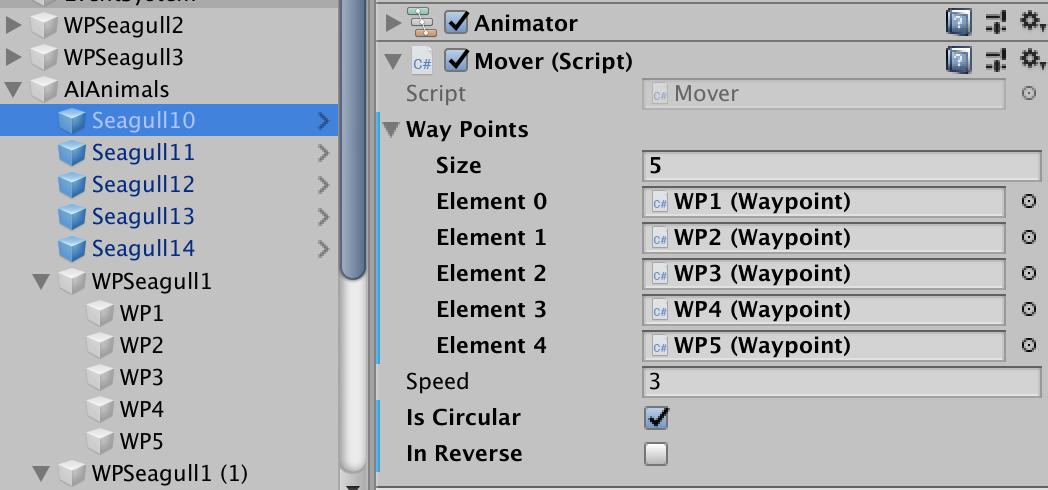
6.2 AI Animals
To be able to move automatically some animals, we need a method found here: https://abandon.ie/notebook/moving-2d-objects-between-waypoints-in-unity.
The code was extended to support prefabs having blend trees (animation): https://gist.github.com/DanielAppert/4d0260cc39a7f29a41da69f68fab0ed7
6.2.1 Prefab creation
Create a prefab with a blend tree having 2 parameters (DirectionX, DirectionY) and 4 animations (move South, West, East, North).
Add the script Mover.cs to the prefab.
6.2.2 Waypoints
Create an empty GameObject.
Create at least two empty GameObjects, as children of the previous one, and add them the script Waypoint.cs.
6.2.3 Movements
Add the waypoints defined above to the object to move.
6.3 Localization
To localize the whole stuff, we use external JSON files. This allows to add easily another language. This method is based on https://unity3d.com/learn/tutorials/topics/scripting/localization-manager.
To use this on WebGL and Android, some specific code has to be added.
The player will choose the language at program start and play in its language until the end.
6.3.1 Scripts
6.3.1.1 LocalizedText.cs
using System.Collections;
using System.Collections.Generic;
using UnityEngine;
using UnityEngine.UI;
public class LocalizedText : MonoBehaviour
{
public string key;
// Use this for initialization
void Start()
{
Text text = GetComponent<Text>();
text.text = LocalizationManager.instance.GetLocalizedValue(key);
}
}
6.3.1.2 LocalizedData.cs
[System.Serializable]
public class LocalizationData
{
public LocalizationItem[] items;
}
[System.Serializable]
public class LocalizationItem
{
public string key;
public string value;
}
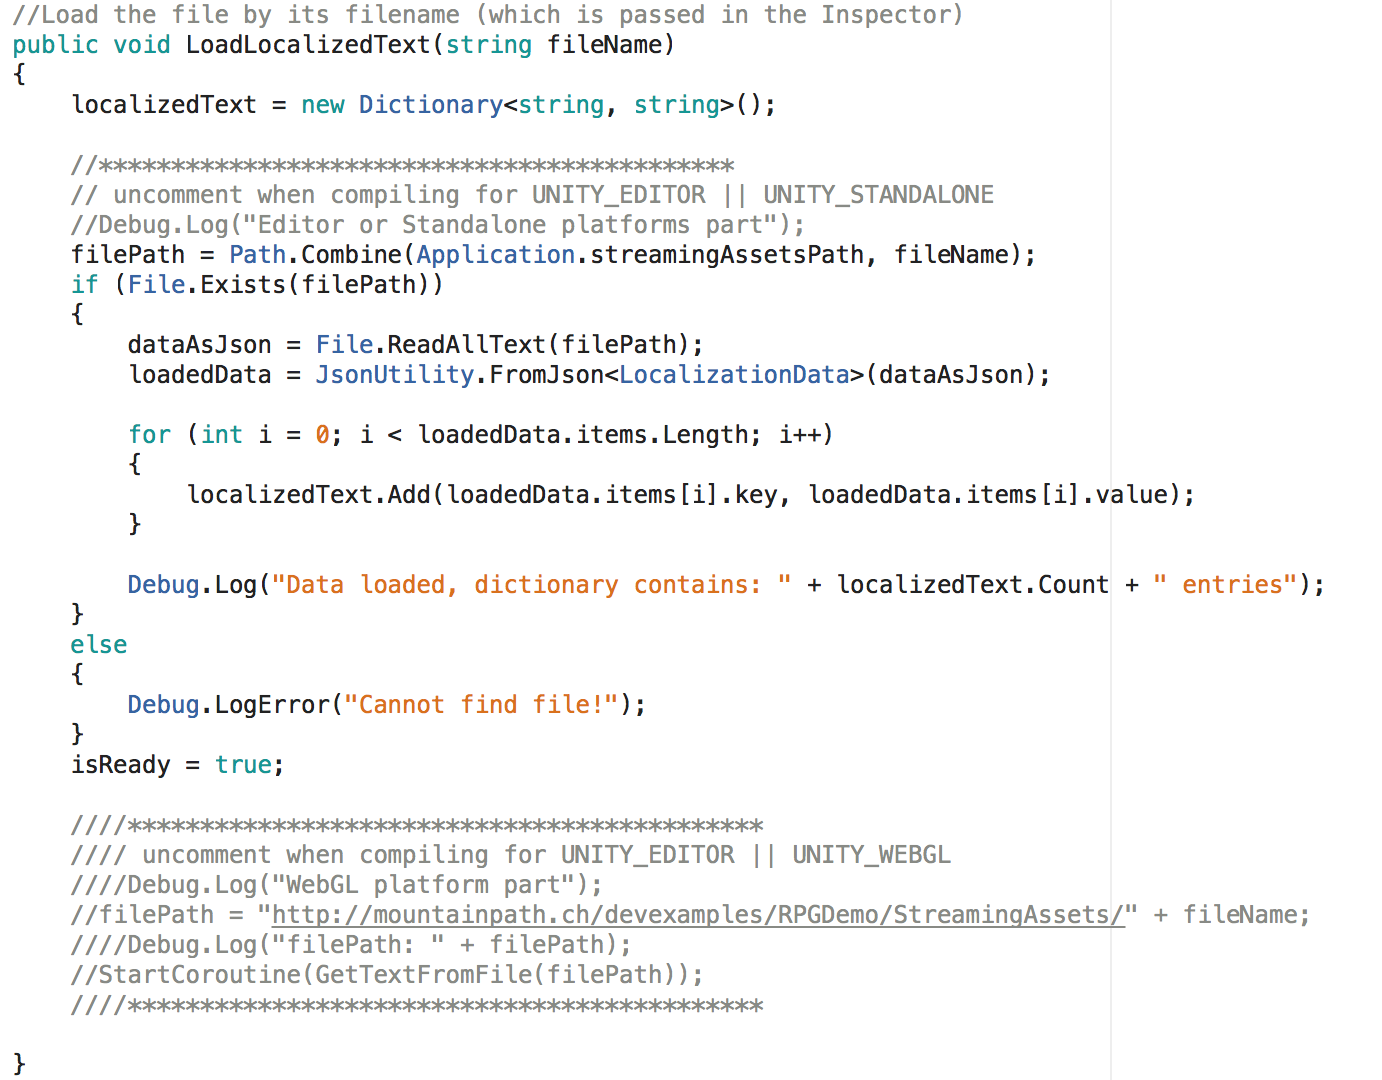
6.3.1.3 LocalizationManager.cs
using System.Collections;
using System.Collections.Generic;
using UnityEngine;
using System.IO;
public class LocalizationManager : MonoBehaviour
{
public static LocalizationManager instance;
private Dictionary<string, string> localizedText;
private bool isReady = false;
private string missingTextString = "Localized text not found";
private string dataAsJson;
private string filePath;
LocalizationData loadedData;
// Use this for initialization
void Awake()
{
if (instance == null)
{
instance = this;
}
else if (instance != this)
{
Destroy(gameObject);
}
DontDestroyOnLoad(gameObject);
}
//Load the file by its filename (which is passed in the Inspector)
public void LoadLocalizedText(string fileName)
{
localizedText = new Dictionary<string, string>();
//********************************************
// uncomment when compiling for UNITY_EDITOR || UNITY_STANDALONE
//Debug.Log("Editor or Standalone platforms part");
filePath = Path.Combine(Application.streamingAssetsPath, fileName);
if (File.Exists(filePath))
{
dataAsJson = File.ReadAllText(filePath);
loadedData = JsonUtility.FromJson<LocalizationData>(dataAsJson);
for (int i = 0; i < loadedData.items.Length; i++)
{
localizedText.Add(loadedData.items[i].key, loadedData.items[i].value);
}
Debug.Log("Data loaded, dictionary contains: " + localizedText.Count + " entries");
}
else
{
Debug.LogError("Cannot find file!");
}
isReady = true;
////********************************************
//// uncomment when compiling for UNITY_EDITOR || UNITY_WEBGL
////Debug.Log("WebGL platform part");
//filePath = "http://mountainpath.ch/devexamples/RPGDemo/StreamingAssets/" + fileName;
////Debug.Log("filePath: " + filePath);
//StartCoroutine(GetTextFromFile(filePath));
////********************************************
}
public string GetLocalizedValue(string key)
{
string result = missingTextString;
if (localizedText.ContainsKey(key))
{
result = localizedText[key];
}
return result;
}
public bool GetIsReady()
{
return isReady;
}
IEnumerator GetTextFromFile(string FilePath)
{
bool successful = true;
WWW w = new WWW(FilePath);
yield return w;
if (w.error != null)
{
//Debug.Log("error: " + w.error);
successful = false;
}
else
{
dataAsJson = w.text;
//Debug.Log("dataAsJson: " + dataAsJson);
successful = true;
}
loadedData = JsonUtility.FromJson<LocalizationData>(dataAsJson);
for (int i = 0; i < loadedData.items.Length; i++)
{
localizedText.Add(loadedData.items[i].key, loadedData.items[i].value);
}
isReady = true;
}
}
6.3.1.4 StartupManager.cs
using System.Collections;
using System.Collections.Generic;
using UnityEngine;
using UnityEngine.SceneManagement;
public class StartupManager : MonoBehaviour
{
// Use this for initialization
private IEnumerator Start()
{
while (!LocalizationManager.instance.GetIsReady())
{
yield return null;
}
SceneManager.LoadScene(1);
}
}
6.3.2 JSON files
The JSON files are stored in a folder named StreamingAssets. The filenames are:
- localizedText_en.json
- localizedText_fr.json
- localizedText_de.json
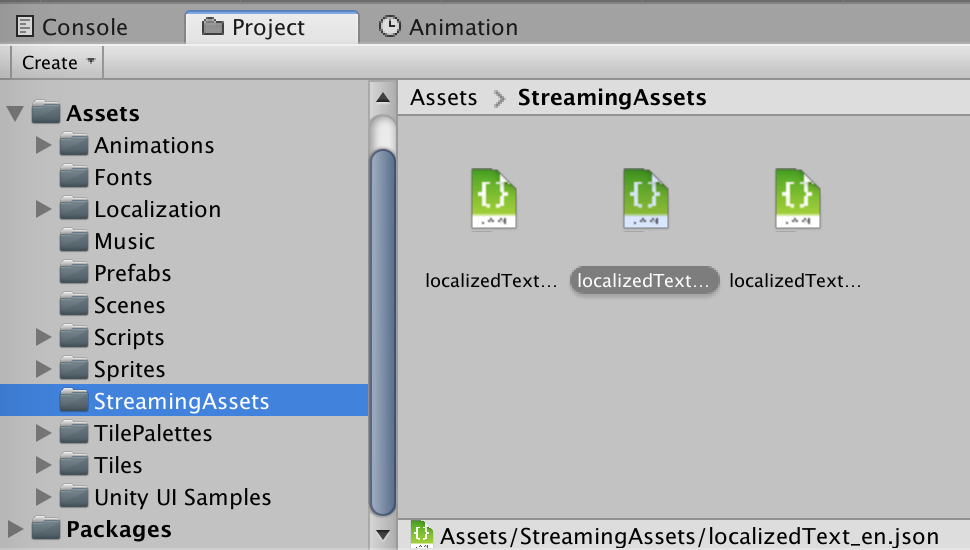
These have all the same structure:
{"items":[{"key":"Game_Title","value":"RPG Demo"},{"key":"Main_StartBtn","value":"Start"},{"key":"Main_HelpBtn","value":"Help"},{"key":"Main_PlayerBtn","value":"Player Setup"},{"key":"Main_CreditsBtn","value":"Credits"},{"key":"Main_QuitBtn","value":"Quit"},{"key":"Help_Title","value":"Help"}]}
6.3.3 Setup
6.3.3.1 Language scene
Create a new scene. In the Build Setup, this scene should be at position 0.
Create a simple canvas with a background image and for each language a flag and a button.
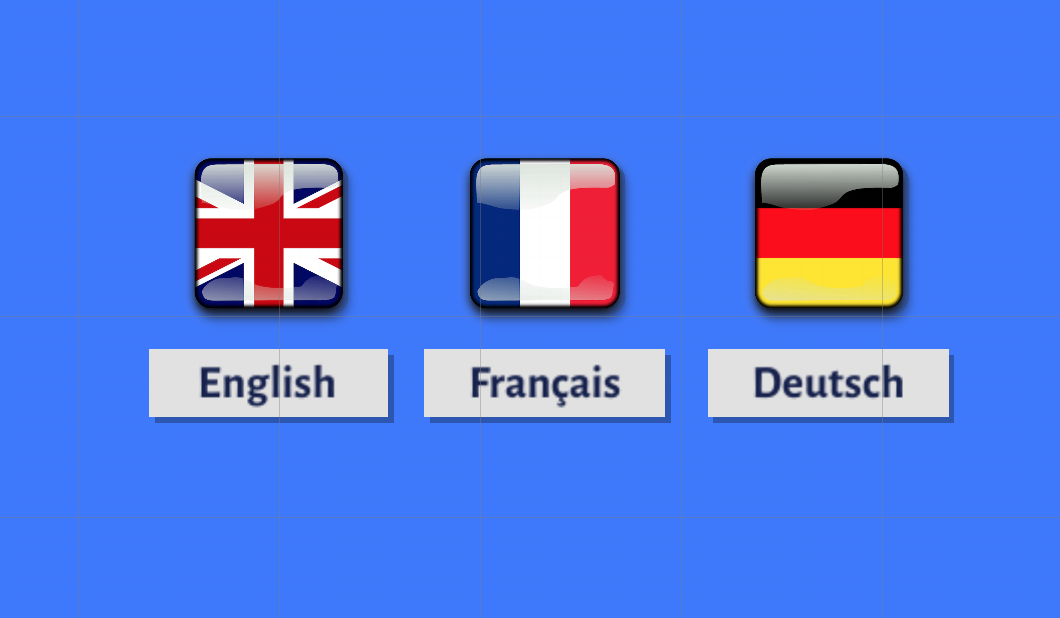
Add an empty GameObject and name it LocalizationManager. Add the LocalizationManager.cs script.
Add another empty GameObject and name it StartupManager. Add the StartupManager.cs script.
Drag and drop the LocalizationManager GO on the OnClick area of each language button and set the localized JSON file.
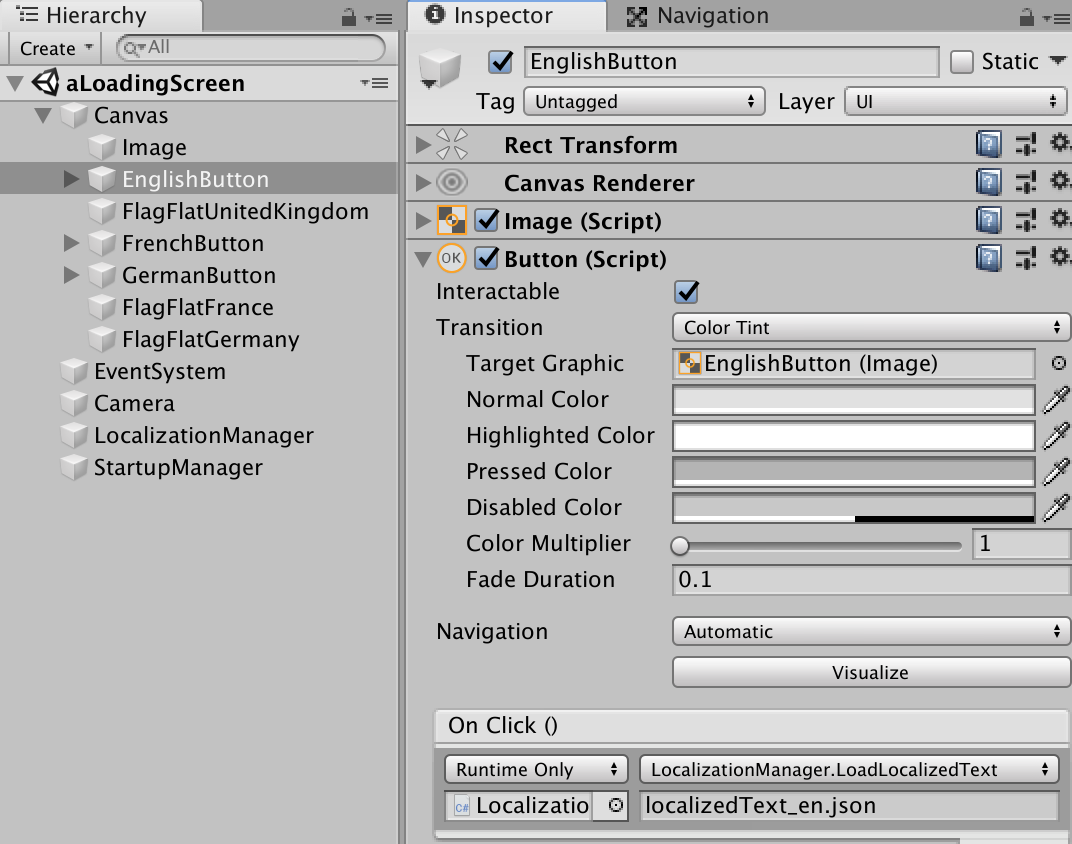
6.3.3.2 Menu scene
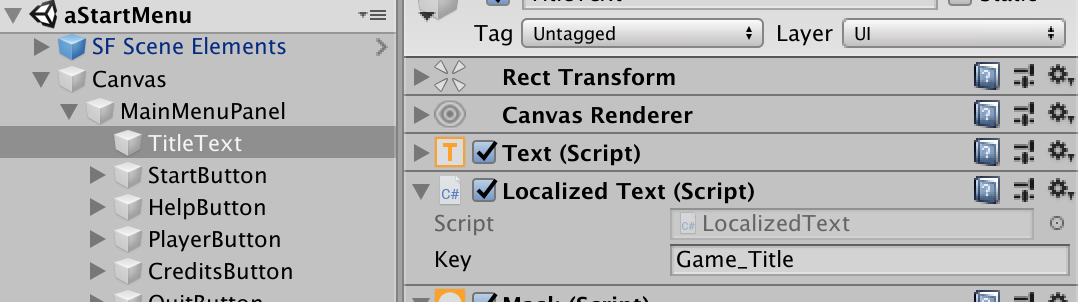
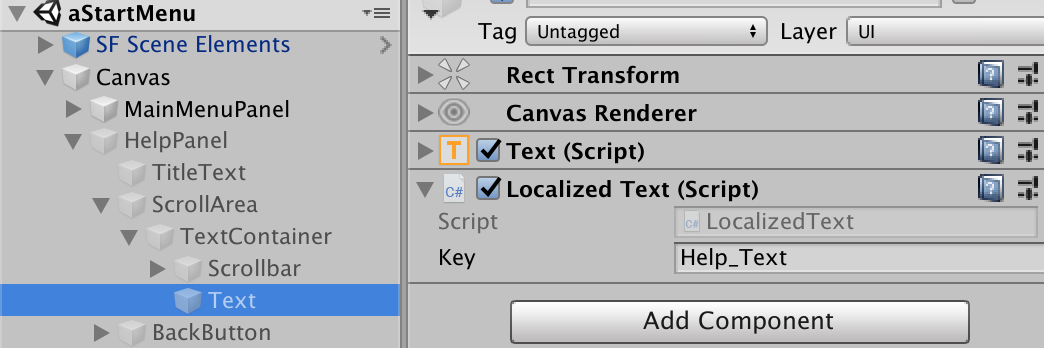
The UI texts (including the button’s and scroll area’s texts) are translated by adding LocalizedText.cs to the Text object and entering the translation key.
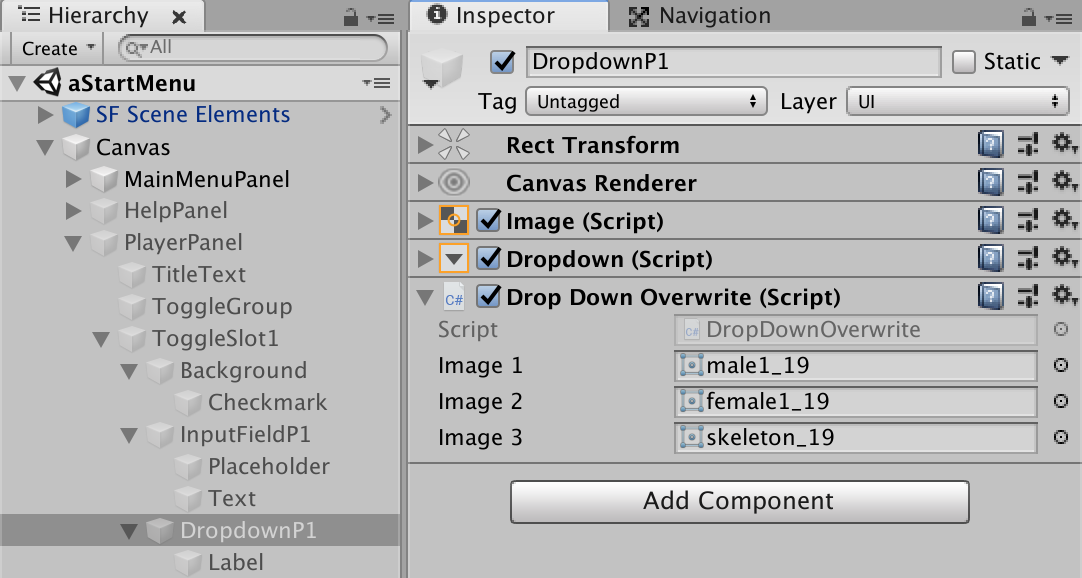
The DropDown needs a DropDownOverwrite script, which recreates the drowdown options from scratch. The text is called using this command:
LocalizationManager.instance.GetLocalizedValue("Player_Dropdown_Boy")
The code is the following one. The sprite images are passed through the Inspector.
using System.Collections;
using System.Collections.Generic;
using UnityEngine;
using UnityEngine.UI;
public class DropDownOverwrite : MonoBehaviour
{
//Use these for adding options to the Dropdown List
Dropdown.OptionData m_NewData, m_NewData2, m_NewData3;
//The list of messages for the Dropdown
List<Dropdown.OptionData> m_Messages = new List<Dropdown.OptionData>();
public Sprite Image1, Image2, Image3;
//This is the Dropdown
Dropdown m_Dropdown;
string m_MyString;
int m_Index;
// Start is called before the first frame update
void Start()
{
//Fetch the Dropdown GameObject the script is attached to
m_Dropdown = GetComponent<Dropdown>();
//Clear the old options of the Dropdown menu
m_Dropdown.ClearOptions();
//Create a new option for the Dropdown menu which reads "Option 1" and add to messages List
m_NewData = new Dropdown.OptionData();
m_NewData.text = LocalizationManager.instance.GetLocalizedValue("Player_Dropdown_Boy");
m_NewData.image = Image1;
m_Messages.Add(m_NewData);
//Create a new option for the Dropdown menu which reads "Option 2" and add to messages List
m_NewData2 = new Dropdown.OptionData();
m_NewData2.text = LocalizationManager.instance.GetLocalizedValue("Player_Dropdown_Girl");
m_NewData2.image = Image2;
m_Messages.Add(m_NewData2);
//Create a new option for the Dropdown menu which reads "Option 3" and add to messages List
m_NewData3 = new Dropdown.OptionData();
m_NewData3.text = LocalizationManager.instance.GetLocalizedValue("Player_Dropdown_Skeleton");
m_NewData3.image = Image3;
m_Messages.Add(m_NewData3);
//Take each entry in the message List
foreach (Dropdown.OptionData message in m_Messages)
{
//Add each entry to the Dropdown
m_Dropdown.options.Add(message);
//Make the index equal to the total number of entries
m_Index = m_Messages.Count - 1;
}
}
}
6.3.3.3 Game scene
Every language specific text (counter box, message box) is called using MessageBox.text = LocalizationManager.instance.GetLocalizedValue("FName_NoBag");
6.3.4 WebGL implementation
WebGL doesn’t accept the StreamingAssets folder and its files aren’t bundled into the app.
To be able to compile the WebGL build, we need to upload the StreamingAssets folder and its files. The needed code is already implemented in the LocalizationManager script, but it needs to be uncommented (and the standalone code must be commented) before compiling.
6.3.5 Android implementation
[TBW]


